Humble Hills Homestead
Documenting my attempt to live a full life
Lye Soap: What is it and how is it made?

I’m sure many homesteaders have the deep seated feeling that they have to learn and do it all. I know I do! For me this deep seated feeling leads to obsessions, and right now my obsession is soap. Evidence of soap making has a history that’s thousands of years old. It’s safe to say soap is a vital component to human basic comforts, after food, water, shelter, and socializing of course. It seems natural to learn to make it!
For many folks the art of soap making has been lost. If you’re like me, I vaguely remember my mother making a batch when I was younger and then she put it on display in a decorative bowl with a pretty accent towel. It had a musty clean smell but was otherwise unscented. It also went unused. She commented that it was a pain to make and the resulting soap bar was harsh and drying to the skin. That set the bar for everything I knew about soap until a few months ago when I decided soap would make a great Christmas gift!
Lye soap can be as easy or as complicated as you like it to be. At its simplest, it is fat and lye mixed together to make glycerin, AKA soap. Knowing the basics is important if you’d like to make soap, or even buy soap. As mentioned, lye soap can be harsh and drying, but as I have come to learn, it doesn’t have to be! Today I would like to lay out the basics of soap and soap making. Of course everything I learned, I learned from various sources online. I have linked to all of these sources but I am using this post as a tool to put a thorough summary all in one place.
What is Soap?
The difference between soap and a detergent is at a chemical level. Soap is made from naturally derived substances (i.e., fat and sodium hydroxide AKA lye), whereas detergent is made from synthetically derived (man-made) substances.
Is one better than the other?
In short, yes. Detergent has the upper hand in most applications. Detergents are more efficient at breaking up dirt and washing it away without leaving a residue. It can be used in cold, warm, or hot water applications for nearly any cleaning purpose. Today’s dish soaps and laundry soaps are detergents, as are most hand, body, and hair washes.
Soap works great for cleaning your skin, but because soap is made from oils, those oils can leave a build up when used for household cleaning and laundry. (Soap scum anyone?) This problem is compounded considerably with hard water. For skin washing purposes, a properly made body soap bar should only leave trace amounts of moistorizing oils on your skin.
Why choose soap?
The advantages of soap are in the ingredients. Soap can be made at home, and you get to choose what goes in it. It can be purely organic, plant-based, ethically, and sustainably made. You can even make your own lye at home. Most importantly, soap making is both fun and useful.
How Soap is Made
Lye soap is made using two different, but similar, processes: cold process method or hot process method. Both methods are effective, but in this post I will only talk about the cold process method.
Soap is made by mixing a combination of sodium hydroxide or potassium hydroxide (lye) and water with fat and oils. The most common type of lye used is commercially made sodium hydroxide. Typically the lye is dissolved in water and then blended with the oils. The lye chemically reacts with the oil to turn it into soap, a process called saponification.
Each oil has a saponification value (SAP value). This refers to the required amount of lye needed to saponifiy fat into soap. The Soap Kitchen has a list of SAP values for two different types of lye for the most common fats and oils, but a Lye Calculator is a much easier. Simply type the weights of oil you’re using, press calculate, and the calculator will tell you the exact weight of water and lye needed.
When the lye water is mixed into the fat, the two liquids will begin to thicken. This initial thickening is known as trace. When the trace is kefir- or buttermilk-like thickness, the mixture can be poured into a soap mold. Put in other words, trace indicates that the soap has thickened enough to to support a drop of soap when dropped onto the surface of the mixture.
After pouring, it takes 12-24 hours on average for the soap to harden enough to be removed from molds. The soap must then rest for four to six weeks before it is ready to use. This process is called curing.
Ingredients
Lye
The best chemical for saponification is sodium hydroxide, or lye, because it is a commercially made and consistent product. However, if you want to take it one step further, lye can be made from wood ash, but the resulting compound is potassium hydroxide, and not sodium hydroxide. It is important to note that potassium hydroxide has different SAP values than sodium hydroxide. The vast majority of information available for soap making uses sodium hydroxide.
It is critical to remember that lye is very caustic. It is a strong alkali meaning it is basic (opposite of acidic). It will burn you if it comes into contact with your skin, so take precaution. Sodium hydroxide lye usually comes in crystal form, which is what I use.
Water and other liquids
Water is used to dissolve the lye. It is recommended to use distilled water to ensure no impurities exist to affect the soap. Trace minerals remaining in your water can react with soap ingredients to cause discoloration. This does not affect the performance of the soap, but does affect the appearance. When making soap for personal use, filtered tap water is fine.
Other liquids can take the place or all or some of the water in your soap. Common ingredients include aloe vera gel/juice and goats milk.
Most recipes use around 22% of the weight of oils in water or other liquids. So if you are using 100 grams of oil, the water will equal 22 grams. However, unlike the lye and oil, there is flexibility on the amount of water than can be used . Determine the SAP value for the weight of the oils being used and measure the lye and water accordingly.
The lye must be mixed with water. IT IS VERY IMPORTANT TO ADD THE LYE TO THE WATER and not the other way around. When the lye is added to the water the water becomes extremely hot, upwards of 200 degrees Fahrenheit and releases fumes. Measure the water in a glass container large enough to also accommodate lye, plus some headroom. I ALWAYS wear gloves to measure my lye (any vessel is fine for this). Still wearing gloves, I carry the measured water and lye outside and stand with any wind to my back and pour the lye into the water. Be careful to avoid breathing any fumes. Stir immediately for about 30 seconds for it all to dissolve. Some trace residue may be noted, which is normal. I usually set the container down on a table outside and allow it to cool. The lye mixture can take some time to cool down. It should be around 120-130 degrees Fahrenheit before it can be mixed with the oil, of the same temperature range. It can take a while to cool so in the meantime, measure your oils if you haven’t already.
I once had some lye water splash on me. I rinsed it off immediately and felt no burn, however I missed a spot on my opposite hand and felt some slight burning. It wasn’t bad, but I wouldn’t have wanted the spot to be any bigger!
Once the curing process begins, this is the phase where the water must evaporate. This aids the soap in hardening. You can quicken the curing process from 4-6 weeks to 3-4 weeks by applying a water discount. However, this speeds up trace. Additionally, fragrance oils can speed up trace. For a beginner soap maker, or when using fragrance oils it may be wise to avoid water discounting.
Oils and Fats
Historically, most soaps have been made with lard, most often beef tallow, as it results in a firm sudsy bar of soap. For many people, tallow was the most readily available fat. Another historically popular fat is olive oil. Soaps made with 100% olive oil are known as Castile soap. Olive oil does not lather extremely well and so some make make Bastile soap, which is about 70% olive oil and some combination of other oils. Olive oil makes a hard, long-lasting soap that is gentle on the skin.
Now with modern global distribution existing at the click of a button, you can easily make a soap comprised of nearly any oil imaginable, although many oils can only comprise a certain percentage of oil to produce a stable bar of soap. Different oils can provide different qualities, with some being better suited to qualities such as cleaning purposes, increasing shelf-life, moisturizing purposes, hardening or softening the soap bar, and/or lathering purposes.
As mentioned, olive oil makes a very hard bar of soap. If you were to try to make a bar of soap from 100% shea butter, for example, the resulting bar would be very soft and may fail to cure appropriately. Typically bar soaps are made of a larger percentage of “hard” oils and a smaller percentage of softer, more moisturizing oils.
In my introduction, I mentioned lye soaps don’t have to be harsh, and here is why: Superfatting means calculating your soap recipe to use slightly less lye than is needed to convert all of the oil into soap. This means a certain amount of oils remain in the soap to moisturize and nourish the skin. This is another reason why many lye soaps are not suitable for washing dishes or laundry. Soap can be calculated with a 1-20% superfat, but 5% is a common percentage. This means 5% of the original oils remain in the soap.
Finally, the weight in oils will be the weight in soap. So 40 ounces of oil will make roughly 40 ounces of soap. On the subject of weights, many recipes use ounces but since there are 4 grams to .01 ounce, I prefer grams as a more accurate unit of measurement.
My Favorite Oils (So Far)
Choosing which oils to use can be very fun! However it is important to consider the maximum amount of any type of oil or fat that can be used in a bar of soap, the properties each oil or fat will add to the soap, as well as cost. Sure, your soap can be up to 33% of Borage Oil, which is rich in nourishing fatty acids and vitamins, but the oil costs $36 a pound! For a beginner soap maker, that just isn’t cost effective and there are other similarly performing oils and butters at lower price points.
My “oil bible” has been a blog called Soap Queen, using this site as a resource I’ve been able to choose my preferred oils. Below is a list of the oils I have personally tried, their shelf life, soap properties, and the amount that can be used in each recipe. I pulled the follow information regarding these oils use in soap from Soap Queen’s Beginner Guide to Soap Making Oils, but provide links to more detailed sources regarding the oils/butters themselves. Linked items with an asterisk (*) next to it indicates that this is a brand I have used in my soaps.
- Castor Oil – 2 years: This thick liquid is extracted from the castor bean plant. It draws moisture to the skin and creates amazing lather in soap. Recommended to use 2-5%. You can use it up to 25%, but more than 10% can make the bars soft and sticky.
- Cocoa Butter* – 2 years: This butter is solid and hard at room temperature. It adds a luxurious feeling to cold process soap and helps to lock in skin’s moisture. Use cocoa butter at 15% or less in cold process soaps – any higher can cause cracking in your final bars. When using unrefined cocoa butter, your products will have a distinct chocolate smell. To avoid the smell, use deodorized cocoa butter.
- Coconut Oil – 18 months: This is a common material used in the soap and cosmetic industry. Coconut oil is super cleansing and produces large bubbles in cold process. It’s so cleansing that it can be drying. It can be used up to 33%, but The Soap Queen recommend using it around 15% for dry or sensitive skin. Choose refined coconut oil for a more stable shelf life and to eliminate the coconut scent.
- Jojoba Oil – 2 years: This product is a liquid wax that contributes to a very stable and long-lasting bar of soap. It is similar to the oils our own skin produces and is often used to help control oily skin, but has many other useful properties. Recommended use is at 10% or less in cold process. More than that can weigh down the lather.
- Mango Butter* – 2 years: This butter is extracted from the fruit kernels of the mango tree. It is also rich in fatty acids, vitamins and minerals. It’s solid at room temperature but melts on contact with the skin. Mango butter feels light and non-greasy to the touch and is odorless. It can be used up to 15% in cold process.
- Olive Oil – 2 years: Olive oil is one of few oils that can be used up to 100% in soap recipes. You can use extra virgin oil, but it has more of a greenish hue, and is less shelf stable. More commonly used, and more affordable, is 100% pure olive oil or olive oil pomace. Pomace is extracted from the pulp of olives after the first oil press. It is the cheapest. Olive oil is a thick oil that moisturizes the skin and creates creamy lather. Compared to pomace, pure olive oil creates softer bars and takes longer to trace. It can be used up to 100% in cold process.
- Shea Butter*- 2 years: Shea butter is rich in fatty acids with rich anti-oxidizing and anti-inflammatory properties. Shea butter feels luxurious and moisturizes skin beautifully; however unrefined shea butter does have a nutty/smokey smell. It helps harden cold process soap and it can be used up to 15%.
- Sweet Almond Oil – 1 year: This is a very common oil in beauty products, including body oils, lotions, and soaps. It’s full of fatty acids and it has a lightweight and moisturizing consistency. It can be used up to 20% in cold process.
Essential Oils vs Fragrance Oils
Essential oils are natural scent extracted directly from the source. You can guarantee the source of the product, use organic, and even sustainably sourced. However not all scents can come from an essential oil (vanilla for example), and certain scents, like orange (I found out the hard way) will fade from soaps.
Fragrance oils come in virtually unlimited options, but they contain a wide mix of chemicals and oils which results in a synthetic product. The scents are often stronger and last longer. However, certain fragrance oils can discolor soaps and speed up trace.
For a personal story, my attempt at orange spice soap was made with orange, clove, and nutmeg, essential oil and vanilla scented oil. The orange faded to leave a mostly vanilla-spice scent. The vanilla scented oil radically sped up my trace and so the resulting soap had air pockets. It was still a lovely bar otherwise.
I also recommend using the Bramble Berry Fragrance Calculator for determining the amount of fragrance recommended in your soap, although the typical range for scents is roughly one ounce of essential oil for 24 ounces of soap.
Coloring Your Soap
You can use natural materials for dye or pigment powder. Natural colors can provide unpredictable results and fade over time, but of course are more natural. Pigment powder provides stronger color, but can contain a range of ingredients. I prefer to use natural dyes and have experimented so far with: alkanet root powder, paprika, and spirulina powder. I found spirulina faded within 2-3 months.
The blog Lovely Greens has well organized posts for soap colorants here. I’ve referred to this post quite often for color inspiration.

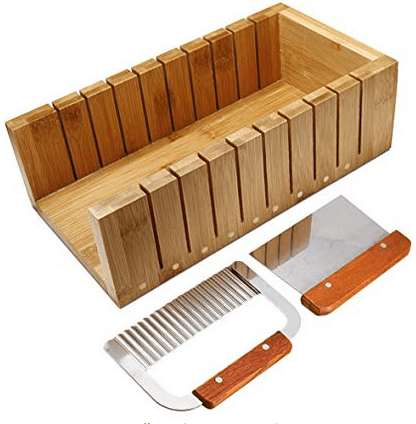
Soap Molds
There are different styles of soap molds but they can be summed up as either silicone soap molds or wood box molds. Wood molds must be lined with wax paper and the soap usually has to be cut once it cures. Silicone can be individual soap bar molds or used as a liner for the wood box. Silicone is easier to clean but can take longer for the soap to harden because it is less porous. For either mold, it can take 12-48 hours for the soap to harden enough to be removed from the mold and allowed to cure. Here are two options for easy-to-use soap molds:

Other Tools
- A large aluminum or steel stock pot
- An immersion blender to ensure even blending of your oils
- A scientific digital scale not a kitchen scale, which tends to be less accurate when measuring small units
- A thermometer capable of reading between 100 and 200 degrees Fahrenheit. I use a digital meat thermometer and say a prayer every time I use it that the battery still works!
Basic Bastille Soap Recipe
Using the Bramble Berry Lye Calculator, I plugged in the numbers for a basic Bastille soap using 70% olive oil and 30% coconut oil with a 5% superfat. I use a silicone soap mold that makes six 4-ounce bars of soap so the total amount of oils needed is 24 ounces. I prefer grams so in grams the amount is 680. This does not account for the essential oil, which is fine.
Ingredients
Liquids & Lye
96.45 grams – Lye (Sodium Hydroxide)
215.68 grams – Distilled or filtered water
Oils & Fats
476.00 grams – Pure Olive Oil
204.00 grams – Refined Coconut Oil
28 grams – Essential Oils of choice (optional; lavender is an easy go-to choice)
Directions
- Set up your area. Have your soap mold ready for pouring, stock pot sitting on the stove, immersion blender plugged in ready to go, kitchen scale near the stove, Pyrex or glass jar for water, rubber gloves for handling lye container for measuring Lye, spatula for stirring lye, spatula for stirring oils, large bowl for measuring oils, and thermometer.
- Put on your gloves. Weigh your lye into a small container. Weigh your water into a glass container. Carefully carry your water, lye, and spatula outside. With the wind at your back, pour your lye into the water, stirring as you go and being careful not to splash. Stir for about 30-60 seconds. Some residual white bits are normal. Leave the lye water outside to cool. Temps can reach as high as 200 degrees and depending on the weather this can take some time to cool.
- Weigh your olive oil and coconut oil and add them to your stock pot. On low to medium heat, melt the oils until they are thoroughly melted and blended, stirring with your extra spatula.
- If using, measure your essential oils.
- Check the temperature of your lye water and your oils. They should be around 120-130 degrees F and within 10 degrees F of each other. So your lye water can be 130 degrees F and your oils can be 120 degrees F and that’s fine.
- When the lye water and oils are the correct temperature, add your essential oils if using and give it a quick stir.
- Wearing your gloves, with one hand pour the lye into the oil and with the other start stirring with your immersion blender. Within 30 seconds to a minute, the oil will begin to thicken, or trace. Once a medium trace has been reached, its time to pour. A medium trace is when the soap is thick enough to support a drop of soap on the surface, or is roughly the thickness of kefir, or slightly thicker.
- Pour your soap into the molds, using a spatula to scrape the pot clean. Smooth the soap with your spatula and gently tap the mold on the counter to release any air bubbles and help the soap settle.
- Let it set for 24-48 hours or until the soap is hard enough to be removed from the mold.
- Set the soap out of reach of sunlight on any surface that isn’t metal, and allow it to cure for 4-6 weeks. During this time the water will evaporate from the soap and the soap will continue to harden.
- After curing, it’s time to use and enjoy your soap! Pat yourself on the back because you’ve done a great job!
Disclosure: Amazon links are affiliate links. If purchasing an item through an affiliate link I will receive a tiny portion of the purchase price which goes toward supporting, and improving upon, this blog. Thank you!

Great post, this explains the lye process much better than most guides I’ve seen. When I started making soap, I kept messing up the lye amounts until I started using a proper calculator to balance everything. This one has been pretty useful for me: https://soaplab.net/lye-calculator made it much easier to adjust things like concentration and superfat. Thanks again for sharing this!
LikeLiked by 1 person
You are so welcome! The calculator gives you so much creative freedom too.
LikeLike