Humble Hills Homestead
Documenting my attempt to live a full life
Easy Profit Tracking Spreadsheet for Egg Sales & Feed Purchases

Please read the instructions tab on the spreadsheet to learn how to download a copy for your personal use. I will not respond to requests to edit the document. Here is a link to the spreadsheet.
I prefer to use Google Spreadsheets because the app is on my phone so each expense or sale can immediately be recorded. This is useful for folks who aren’t great with organizing receipts, such as myself. Once you open the spreadsheet, there will be three tabs at the bottom left hand corner of the screen. Under the first tab that says “Instructions” you will find how to download the spreadsheet to edit for yourself. No need to request access, you can download your very own copy! I receive numerous requests each week for my feed calculator, and I no longer respond to them. Everything you need to know about how to download the spreadsheet is in the instruction tab of the spreadsheet itself! I promise! You can also download this as a Microsoft Excel Spreadsheet if you would prefer to use that platform.
The remaining two tabs are straight forward, one is for tracking purchases and the other is for tracking sales. Simply fill in the appropriate fields and let the spreadsheet do the hard work for you.
Unfortunately, I am not currently breaking even. I have spent a total of $722.13 on my flock this year, including feed, treats, pine shavings, and egg cartons. I have only sold $476 worth of eggs. I estimate I “saved” at least $150 on eggs for our own consumption. We typically eat 2.5 dozen eggs for breakfast and up to another dozen in other uses.
I’d love to hear how your tracking journey goes! Feel free to comment and let me know.
Using Eggs to Reduce Allergen Levels in Cat Saliva

Recently I learned of a cat food made by Purina which is intended to reduce the amount of allergens that cats produce, allergens which cause humans to have allergic reactions to cats. The science behind it comes from eggs. This piqued my interest because I currently have 47 chickens which regularly produce eggs. So how does it work?
Ninety percent of humans who are allergic to cats are allergic to the Fel d 1 protein which is produced in cat saliva. The protein is spread through their fur while grooming and is released into the air and hard surfaces as the cat sheds. This protein can be “neutralized” when bound to a specific antibody (IgY immunoglobulins), an antibody that not all humans produce. Incredibly, this antibody is also produced by chickens that have been exposed to the Fel d 1 protein, either by exposure to felines, or via injection of the Fel d 1 protein. This antibody is present in the eggs laid by chickens, and when your feline companion eats those eggs, the amount of Fel d 1 protein produced by the cat is shown to be reduced by up to 47% in some studies. This is good news for cat lovers who suffer from unfortunate allergies to their feline friends.
The Humble Hills Homestead flock is regularly exposed to five of the Homestead’s feline residents, making it likely that feeding HHH’s eggs to your feline companion regularly will help reduce that cat’s production of that pesky Fel d 1 protein. That is good news for friends and family who suffer from cat allergies.
Sources
Matulka, R. A., Thompson, L., & Corley, D. (2020). Multi-level safety studies of Anti Fel d 1 Igy Ingredient in Cat Food. Frontiers in Veterinary Science, 6. https://doi.org/10.3389/fvets.2019.00477
Satyaraj, E., Li, Q., Sun, P., & Sherrill, S. (2019). Anti-fel D1 immunoglobulin y antibody-containing egg ingredient lowers allergen levels in cat saliva. Journal of Feline Medicine and Surgery, 21(10), 875–881. https://doi.org/10.1177/1098612×19861218
Processing Day on the Homestead
Earlier this spring I hatched out twelve chicks. Unfortunately two were lost to a feral cat, and of the ten remaining, seven were cockerels! We opted to keep two of them, a pure bred blue cooper Marans, and the offspring of my sweet Betty Boop who we lost earlier this year. We were very fortunate to have help with the process. We are fortunate to have help with a lot of things! Honestly, without our friends and neighbors, we wouldn’t be where we are today.
Here is a video documenting the day. It wasn’t designed as an educational video, but could certainly shed light on what processing day is like.
My New Chicken Coop: Cluck Mansion

I acquired my first flock (four chickens) and a classic style 4’x6′ Amish built chicken coop that I bought off of Facebook Market Place in the spring of 2018. We ended up moving to a neighboring state and brought the coop and chickens with us to establish our first homestead, Humble Hills Homestead (formerly Humble Hills Farm). We have just over 4.6 acres. By that time I had added seven pullets. Soon one of the pullets decided to go broody and I let her hatch. And then I let her hatch again. And then I bought some hatchery chicks. After whacking my forehead on the rafters more than a few times, battling carpenter bees, and not one but three black bear attacks, the little Amish coop is left in shambles, and the birds are sorely over crowded. Along with several other reasons, the time had come to start our very first coop build. We had very little building experience except for work done on and around the house. The coop was our biggest project.
Here was the first coop:
Here is the outside of the new coop for a teaser:
Goals for the Coop:
- Large enough to handle 40-50 birds (but I’m trying to stay below 40)
- Tall enough to never risk whacking my noggin’ on a single rafter
- Storage space for ALL chicken merchandise
- Work bench and space for any medical procedures.
- Ability to connect to water and power
- Separate space for an “extra coop” that could be used for introducing new flock, isolating a small breeding flock (up to five birds), brooding pen, or safe space for broody mom
- Large “main” coop
- Access between the small coop and main coop for when the small coop is not in use for any of the above purposes
- Two pop doors, one for each coop (the small extra coop and the main coop)
- Covered run with ability to put up temporary dividers.
The Build
We started the build sometime in September 2020. In a nutshell, I wanted a coop so versatile I’ll not have to build a new one for as long as I live unless a disaster occurs, or I’d like to get more serious about breeding. The entire foot print takes up 400 sq feet. The building for the coop itself is elevated roughly 2′ to provide run space and is 10’x20′ and the additional run space (not including under the coop) is also 10’x20′. As of the time of this writing, the posts have been dug and concreted in, but the roof and run have not been completed. Coop and run will be/are covered with a metal roof. Run will be wrapped with 1″x1″ 16 gauge hot dip galvanized steel fencing from CritterFence.
General floor plan:
Progression Photos
While the run may not be finished, the chicken coop is now complete, with the exception to adding work benches to the storage area.
Before I share progression photos though, I have to pause for a moment to talk about my partner. He didn’t want chickens. He didn’t want to farm. He isn’t a gardener. What he loves is dirt bikes and motorcycles, and he’s even won a national championship for racing dirt bikes. Apparently he loves me too, though. He’s never hesitated to support my wants and dreams at any moment. I came home from work one day to find him building a raised garden bed for my first ever garden as a complete surprise, and he’s supported every wild idea since. I wouldn’t be where I am without him.
Now on to the photos. My partner dug all of the holes, and put in all of the posts and floor joists by himself. The sad reality is his job is substantially more flexible than mine, and he is much stronger, taller, and more experienced. Much of the work falls on him.
Framing was actually a unique opportunity for me. Not only was I home and able to help, but I actually was hands on with framing from start to finish, and did most of this with my partner’s dad while his mom hung out and enjoyed the chickens.
Because we started this in the middle of the pandemic, it is quite unfortunate that we had to overpay for our lumber. In general prices were up, but we also had to buy more expensive and higher quality materials than we would have preferred because they were out of stock with so many items. The walls are 3/4″ plywood made for flooring. We also had no choice but to purchase plywood that had tongue and groove. Advice on tongue and grooved plywood: Just don’t. It is the worst and throws all of your measurements out of whack. It was so awful we cut the tongue and grooves off in some instances. For all of the lumber, wall paneling, windows, linoleum, and insulation we spent about $3,800. Honestly the full cost is probably closer to $5000 when factoring in fencing, roofing, siding and some electric components.
We had bought roofing for our garage and, um, borrowed some for the chicken coop.
The facia on the coop is from some rough cut local lumber we bought for only a small cost. We’ve used this lumber on and off for smaller projects within the coop, but no major structural components were used with it. The building was wrapped until we could figure out what we wanted to do with siding. We ended up finding 500 sheets of reclaimed tin for $400 that was enough to put siding on a large garage and on the chicken coop with a few pieces left over. All but one of the windows were bought brand-new. I’ve used reclaimed windows for my greenhouse, but the reality is the quality of them is always very poor. I only wanted to do this project once! The door was brand-new and pre-framed from the Restore, and only cost $20. Sweet!
While we kept the rafters open, we bought two strips of soffit and split them in half to cover the exterior rafters, rather than use hardware cloth. They were just screwed into place. If worse comes to worst, this could be exchanged for hardware cloth, but I don’t have any moisture issues in my current coop, and it is severely under ventilated. This was one area where I had to let go of how I wanted it done. I did want hardware cloth, but I wasn’t the one that installed this, so I forfeited my opinion here.
I was on the rocks about spending a couple hundred on insulation boards, but I did it anyways. The sheet on the ceiling my partner tacked up there to get it out of the way, but it’s been moved. There is a 1/4″ foamboard insulation barrier under the metal roof however. I am happy I insulated because there is a noticeable reduction in the draftiness. Probably because of the difficulties we had with the tongue and groove plywood, we couldn’t get seals as tight as we wanted between each sheet of plywood. This picked up the slack. For all of that work though, the floor isn’t insulated at all! I figured the bedding will help though.
Because of the insulation, we also bought wall paneling to cover the insulation. Unfortunately it did get wet so it bled in some places (the weird brown spots). It bothers me a little because I am a perfectionist, but the paneling was definitely not perfect. We covered the floor with linoleum to protect the plywood. The linoleum was an unfortunate hefty cost, at about $200. It was the cheapest available, but at least it has a beautiful pattern! I imagine this might need covered or replaced some day.
Here was my little side project: we need to trim out the windows in our bathroom as well as add base boards and crown molding. I learned how to utilize the table saw more effectively and to cut 45* angles. I used the chicken coop as an excuse for learning a new skill. I can claim 100% of the work for the window trim and baseboards.
They aren’t perfect, but I can’t help but to be proud of myself anyways.
From this view, I am standing in what is designated as the storage area. At the time of writing, the coop is finished, but installation of a work bench and storage area has not been completed. You can see from where I am standing the main coop to the left, and the brooder coop to the right. There is a little “pop door” to open the area up for the chickens when brooding area is in use.
Wide angle lens view of the coop. The main coop is finished and ready for my girls (and guys)!
Poop boards were made with molded aluminum and are now lined with dried coffee grounds (not pictured). Roosts were trees from the backyard. Not sure how the girls feel about them just yet. Their old roosts were 2x4s with the skinny side up, and wrapped with pool noodles.
Nest boxes! I am trying out fake grass squares. The girls have been moved in for two days at the time of writing, and thus far had no laid an egg in the “correct” nest boxes, but they have laid under the boxes, and in the nest boxes of the brooder coop. We may need to reassess this setup. Unfortunately.
View standing outside of the main coop.
Brooder coop. At the time of writing, exterior pop was still not installed. We’ve gotten about 8″ of snow so wood working has come to a screeching halt.
My partner whipped up these octagon holders for the food and water. They look cool and are working very well.
The flock is checking things out!
My friendly little Maddy girl seems to like her new space!
I hope you all liked the Cluck Mansion story! Of course the coop is not 100% finished. We still need to add on the covered run, and I will be sure to provide updates when the time comes.
Name Change and Goals for 2021

Yesterday, December 21st, we had a small Winter Solstice celebration. On Sunday I assembled a “Hunter’s Pie” (AKA Shepherd’s Pie featuring venison in place of lamb) so on Monday I could come home and simply pop dinner in the oven. There was some buttered rum, card games, and most importantly a candle lighting ceremony. The candle lighting ceremony involves lighting a tall pillar candle which represents the sun. This is to welcome the sun as days grow longer following Winter Solstice. After the sun candle we each stated our desires and goals for 2021 then lit our own personal candle. The year 2021 is a year of change for us for many reasons.
First, I have been feeling more motivated to push my brand harder. In an effort to do so, based on the suggestion of a dear friend I have opted to re-brand my “company” from Humble Hills Farm to Humble Hills Homestead. In retrospect, I chose the wrong name from the onset! Homestead better encompasses my goals which are, quite simply, to have a thriving homestead.
Second, and somewhat related to the first, I am hoping to expand my flock and generate more revenue by breeding and selling chicks. At this point, if I do not manage to sell chicks, I am still wanting (needing, really) to expand my flock and failure to sell will achieve the expansion goal. My goal is to breed my blue copper Maran rooster, Mr. Fancy Feet, to my black copper Maran hen, one olive egger (blue copper Maran and blue Ameraucana cross), my splash Americauna, and potentially my welsummer hen, to create an eclectic mix of pure bred Marans, dark egg layers from welsummer x maran cross, and F1 and F2 olive eggers.


My third and forth focus is to expand more on my home good products, such as soaps, and to apply what I learned from gardening last year to hopefully yield a substantially larger harvest in 2021. If I can pull out a larger harvest, I may have more garden goodies for sale.
Finally, we have learned some unexpected news. As I had taken a new job with smaller pay in order to focus on the homestead, my partner in crime learned recently that his employer of 15 years will be shutting their doors permanently. I don’t know yet what this news means for us, but I do know I am so proud of him. He took the news in stride and is both motivated and excited to start his own business in autobody repair. On our little homestead is an old garage, built in the 70s, which was a working business in its time. It has fallen to disrepair, but we hope to turn it around and bring it back to life. Building your own business is both freeing and empowering, but we will need all the love and support we can get to achieve this goal. I have no doubt he has it in him!
A tentative goal, though not officially on our list, is to explore other avenues of media, such as YouTube, to acquire more followers. I never aspired to do this, but we’ve actually received encouragement from many friends and strangers. We’ve had many strangers stop by our house to ask about our projects. I supposed if we seem interesting enough to random strangers, perhaps the rest of the world will be interested, too? I’m not very crafty or artistic. In fact video media seems very overwhelming, but I will certainly keep this idea on the backburner. We have also tossed around the idea of building a small shop on the property for distribution of goods. Both of these things may be a 2022 goal. We shall see.
If you have any ideas, suggestions, questions, words of support, or even offers of help, my inbox and comment section are wide open.
Chicken Feet Stock and the Benefits of Collagen

I know when you hear the words “chicken feet,” your first thought is probably far from “delicious stock,” but not only is stock made with chicken feet delicious, it is also incredibly healthy. Chicken stock made from chicken feet is rich in a radically underappreciated and misunderstood protein colloquially known as: collagen. Collagen is an essential part of a healthy diet.
Benefits of Collagen
Many folks think of collagen in terms of unwanted fat, but like many things in our diets: collagen is very healthy in moderation. Collagen is also not a fat, but in fact is a type of protein. However, collagen lacks in one essential amino acid, so it is not considered a complete protein (8). Numerous studies have proven the health benefits of collagen which include improvements in skin elasticity (10), the recovery of lost cartilage tissue (6, 13), reduced joint pain due activity (12, 2), strengthened tendons and ligaments (9, 3, 11, 1), increased lean body mass in elderly men and premenopausal women (12, 4), and increased bone mineral density in postmenopausal women (5). In summary, collagen is a functional food which has been shown to exhibit important physiological functions with a positive impact on health(8).
Preparing and Using Chicken Feet for Homemade Stock
Okay, so we know collagen is healthy for us, but allow me to reiterate: collagen-rich chicken stock is the most delicious stock you will ever consume. Even when I don’t make my stock with chicken feet, everyone who has eaten my soups comment on the tastiness of the soup. The secret is in the homemade stock. I promise. While all homemade stocks are usually delicious, a collagen-rich stock is a little extra special. To know if your stock is rich in collagen, a collagen-rich stock will congeal, or thicken, somewhat when it is cooled in the fridge. A broth or stock which is not rich in collagen will stay thin like water when cooled.
Last month I wrote about raising and processing Cornish meat chickens, and I promised I would talk about how to prepare and use the chicken feet for homemade stock. You may find chicken feet at some Asian markets, and most likely they will already be prepared and ready for immediate use. If you are like me and got your feet from processing chickens, you will need to prepare them.
Chicken feet are dirty. In order to use them you must first peel the feet. Yes, you read that correctly. I said peel them. Just like you blanch the body to lose the feathers for removal, you most also blanch the feet. Simply boil them in water for about 15 seconds, dunk them in ice water, and the skin will be loose enough to peel. This is a tedious task. It took me a total of about three hours to boil and peel feet, which I did over the course of three days.

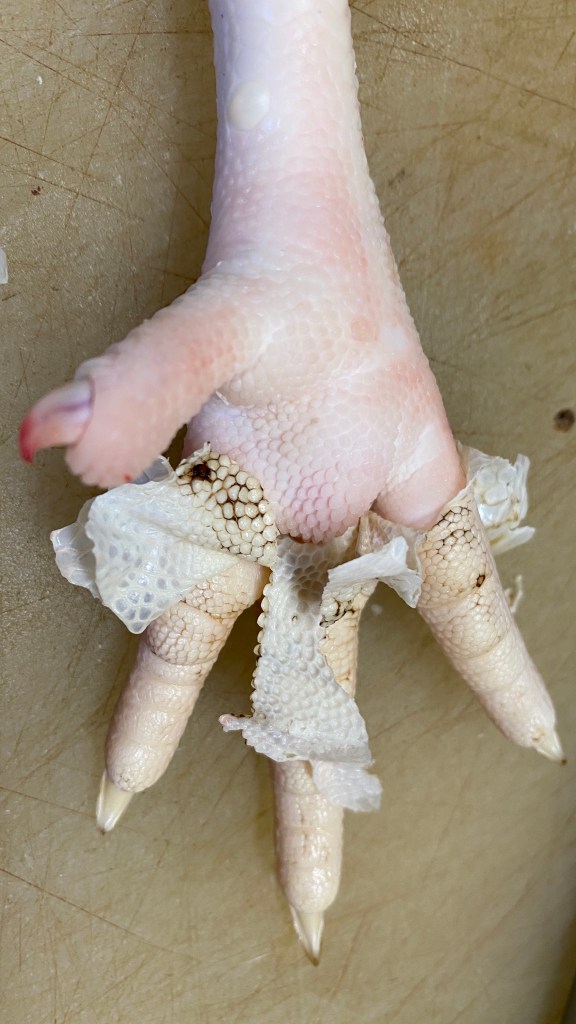
There is not much of a right or wrong way to peel after you blanch. I mostly used a knife to grasp edges of skin and start peeling. It won’t all come off like a glove. It will likely peel off in bits and pieces. Be sure to remove the cap of the toe nail, too. Just grab the nail and tug, and you will see that the outer layer of the toenail pops right off. In the above photo one of four of the nails had been popped off.

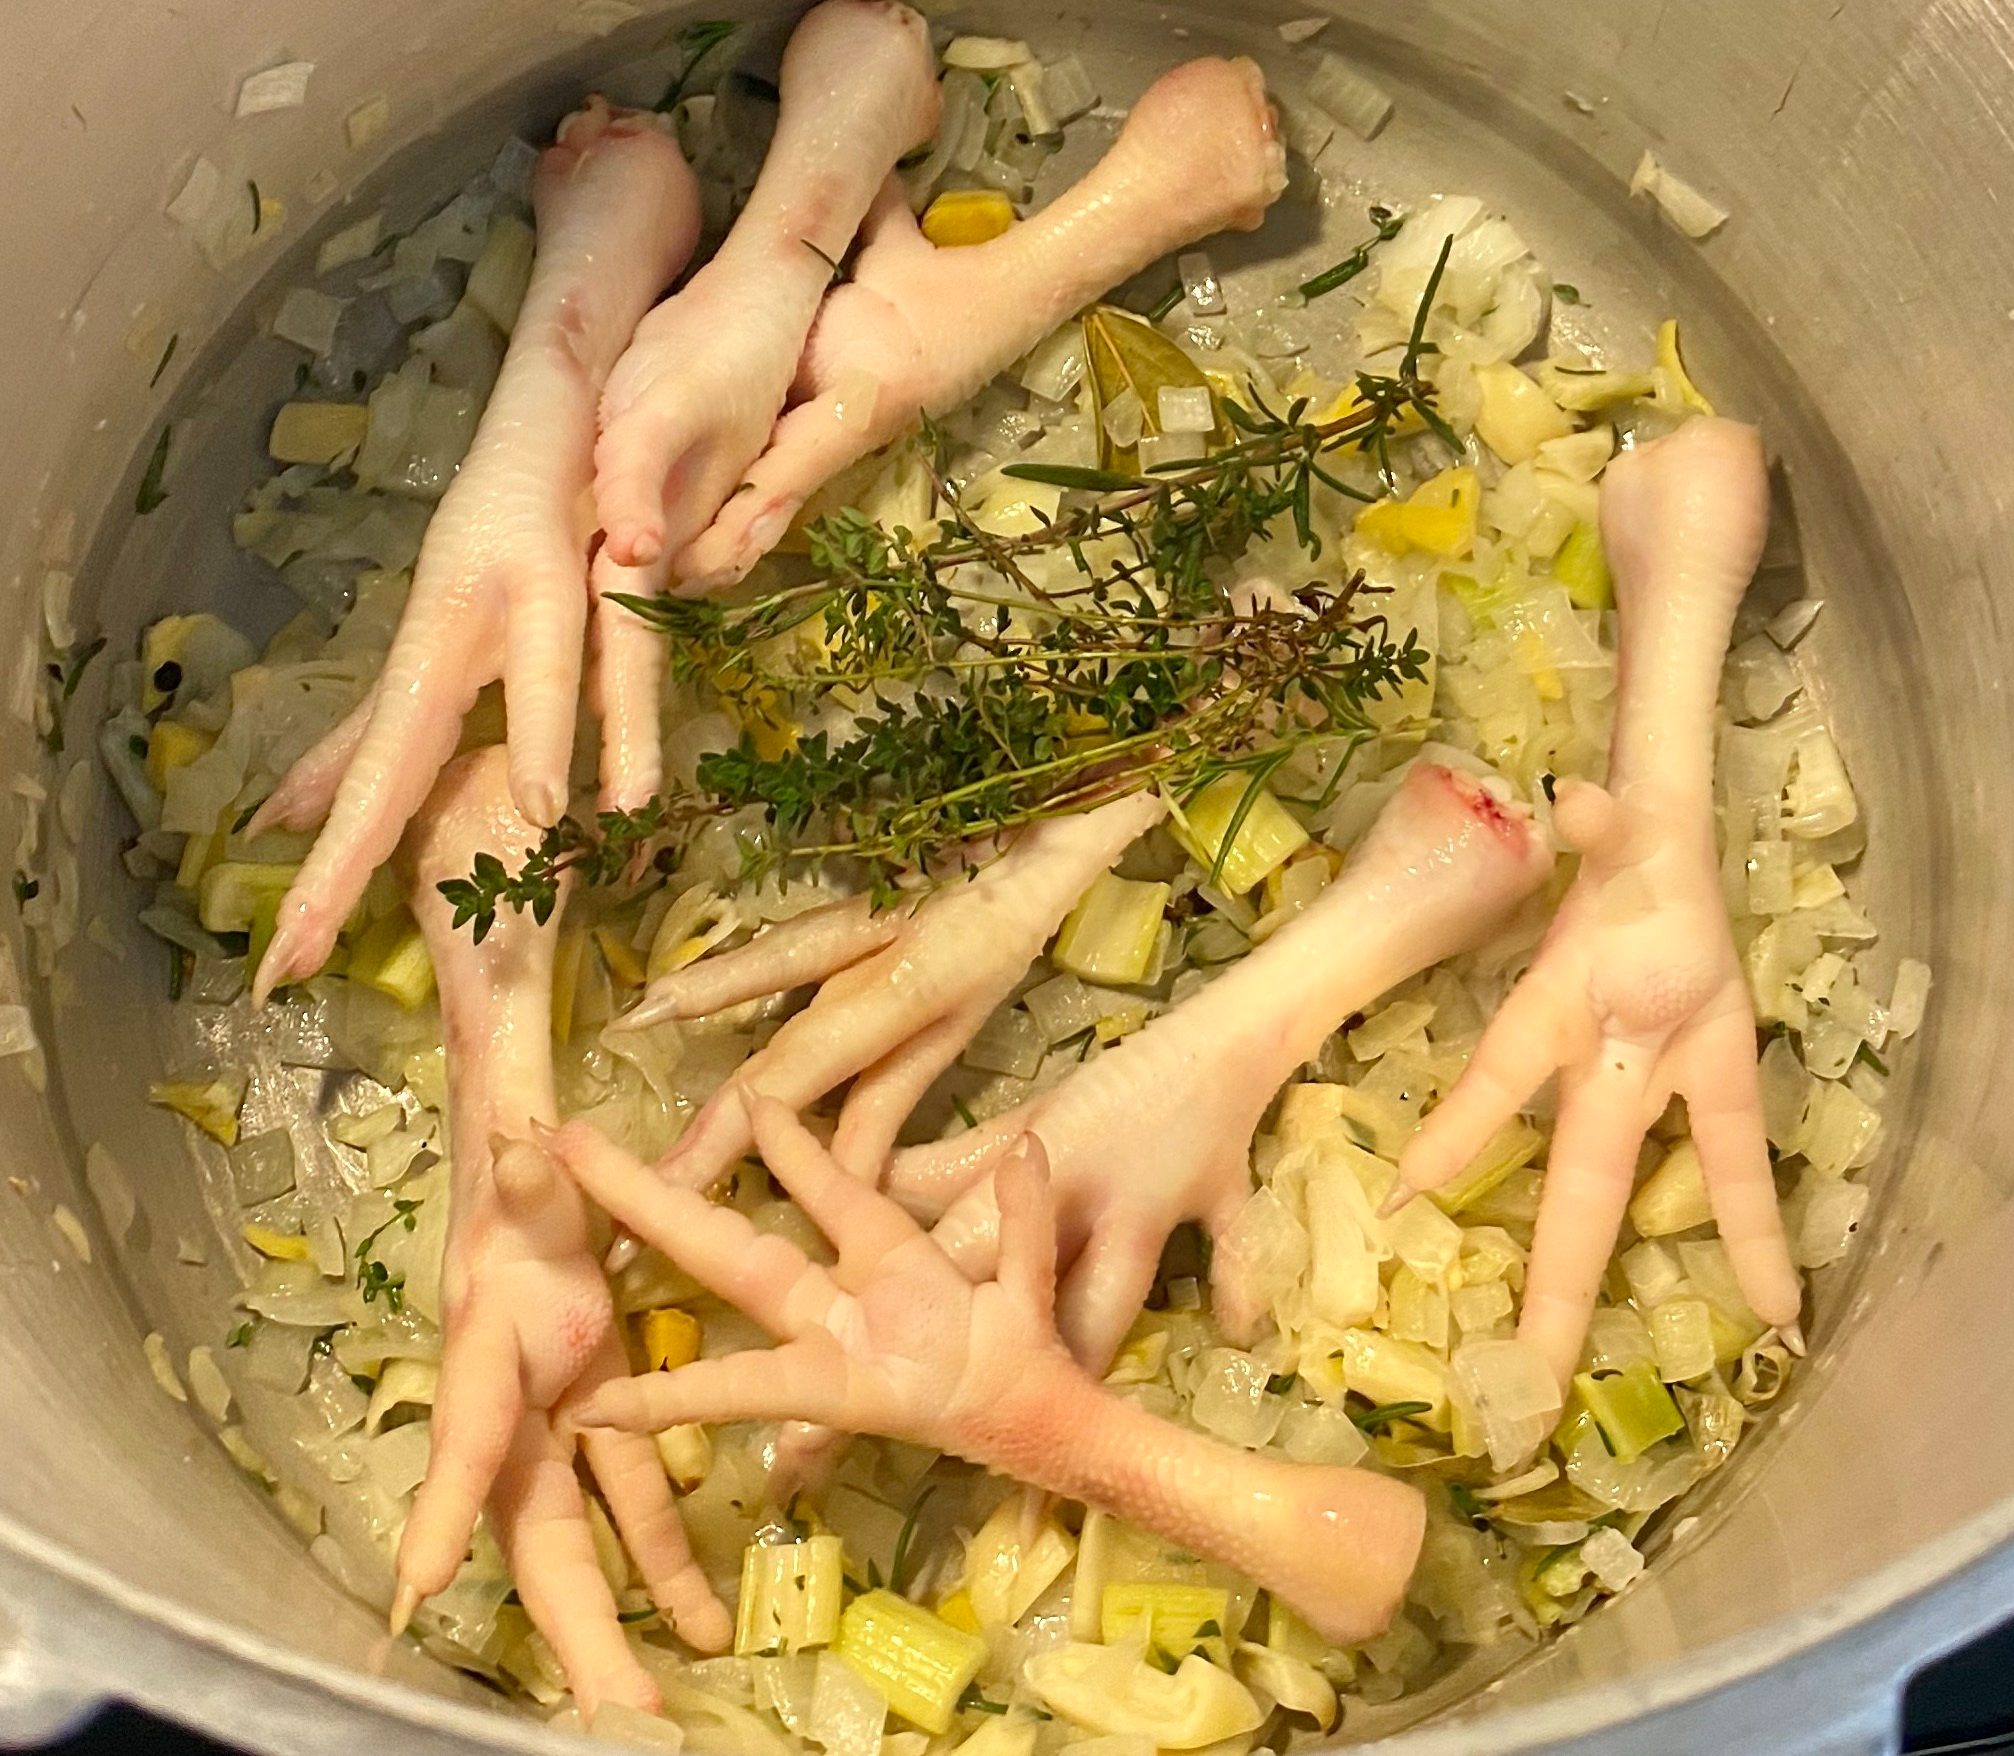

After peeling, it’s time to start your stock. I won’t bore you with a detailed recipe. Chances are if you’ve found this post, you’ve already made stock before. Start with your favorite ingredients. For this batch of stock I used 8 chicken feet and three chicken carcasses (after removing legs, breasts, wings, and tenderloins), two diced onions, some celery, a head of garlic, a big knob of ginger, some rosemary and thyme sprigs, a bay leaf, one teaspoon of kosher salt per quart, and 10 quarts of water. I probably could have used two carcasses and had a flavorful stock. I pressure cooked in my dial gauge canner for about 20 minutes after reaching 10 pounds of pressure.
I ended up straining the broth and putting it in the fridge to cool for a day so I could skim off the fat. I usually render it down so it will store in the fridge for a few months, if it even lasts that long. I cook with the fat! I reheated the pot before filling my jars, and I canned 7 quarts of the stock and froze the remaining three quarts.
This stock was so delicious I could have heated it in a mug and drink it. Unfortunately I’d quickly run out of stock for soup if I did that often!

I hope this post may inspire someone to embrace the deliciousness of homemade chicken feet stock, but I can assure you even if you don’t use the feet homemade stock still better than anything you buy from the store.
As always, please feel free to comment or email me with any questions, comments, or concerns!
Citations
(1) Baar K. Stress relaxation and targeted nutrition to treat patellar tendinopathy. Int. J. Sports Nutr. Exerc. Metab. 2019;4:1–5. doi: 10.1123/ijsnem.2018-0231.
(2) Clark K.L., Sebastianelli W., Flechsenhar K.R., Aukermann D.F., Meza F., Millard R.L., Deitch J.R., Sherbondy P.S., Albert A. 24-Week study on the use of collagen hydrolysate as a dietary supplement in athletes with activity-related joint pain. Curr. Med. Res. Opin. 2008;24:1485–1496. doi: 10.1185/030079908X291967.
(3) Dressler P., Gehring D., Zdzieblik D., Oesser S., Gollhofer A., König D. Improvement of functional ankle properties following supplementation with specific collagen peptides in athletes with chronic ankle instability. J. Sports Sci. Med. 2018;17:198–304. doi: 10.1016/j.jbmt.2018.09.037.
(4) Jendricke P., Centner C., Zdzieblik D., Gollhofer A., König D. Specific collagen peptides in combination with resistance training improve body composition and regional muscle strength in premenopausal women: A randomized controlled trial. Nutrients. 2019;11:892. doi: 10.3390/nu11040892
(5) König D., Oesser S., Scharla S., Zdzieblik D., Gollhofer A. Specific collagen peptides improve bone mineral density and bone markers in postmenopausal women-A randomized controlled study. Nutrients. 2018;10:97. doi: 10.3390/nu10010097.
(6) McAlindon T.E., Nuite M., Krishnan N., Ruthazer R., Price L.L., Burstein D., Griffith J., Flechsenhar K. Change in knee osteoarthritis cartilage detected by delayed gadolinium enhanced magnetic resonance imaging following treatment with collagen hydrolysate: A pilot randomized controlled trial. Osteoarthr. Cartil. 2011;19:399–405. doi: 10.1016/j.joca.2011.01.001.
(7) Meléndez-Hevia E., De Paz-Lugo P., Cornish-Bowden A., Cárdenas M.L., Paz-Lugo P. A weak link in metabolism: the metabolic capacity for glycine biosynthesis does not satisfy the need for collagen synthesis. J. Biosci. 2009;34:853–872. doi: 10.1007/s12038-009-0100-9
(8) Paul, C., Lesser, S., Oesser, S. Significant Amounts of Functional Collagen Peptides Can Be Incorporated in the Diet While Maintaining Indispensable Amino Acid Balance. Nutrients. 2019;5. doi:10.3390/nu11051079
(9) Praet S.F.E., Purdam C.R., Welvaert M., Vlahovich N., Lovell G., Burke L.M., Gaida J.E., Manzanero S., Hughes D., Waddington G. Oral supplementation of specific collagen peptides combined with calf-strengthening exercises enhances function and reduces pain in Achilles tendinopathy patients. Nutrients. 2019;11:76. doi: 10.3390/nu11010076.
(10) Proksch E., Segger D., Degwert J., Schunck M., Zague V., Oesser S. Oral supplementation of specific collagen peptides has beneficial effects on human skin physiology: A double-blind, placebo-controlled study. Skin. Pharmacol. Physiol. 2014;27:47–55. doi: 10.1159/000351376.
(11) Shaw G., Lee-Barthel A., Ross M.L.R., Wang B., Baar K. Vitamin C–enriched gelatin supplementation before intermittent activity augments collagen synthesis. Am. J. Clin. Nutr. 2017;105:136–143. doi: 10.3945/ajcn.116.138594.
(12) Zdzieblik D., Oesser S., Baumstark M.W., Gollhofer A., König D. Collagen peptide supplementation in combination with resistance training improves body composition and increases muscle strength in elderly sarcopenic men: a randomised controlled trial. Br. J. Nutr. 2015;114:1237–1245. doi: 10.1017/S0007114515002810.
(13) Zdzieblik D., Oesser S., Gollhofer A., Koenig D. Corrigendum: Improvement of activity-related knee joint discomfort following supplementation of specific collagen peptides. Appl. Physiol. Nutr. Metab. 2017;42:1237. doi: 10.1139/apnm-2017-0693.
Raising and Processing Cornish Cross Meat Chickens

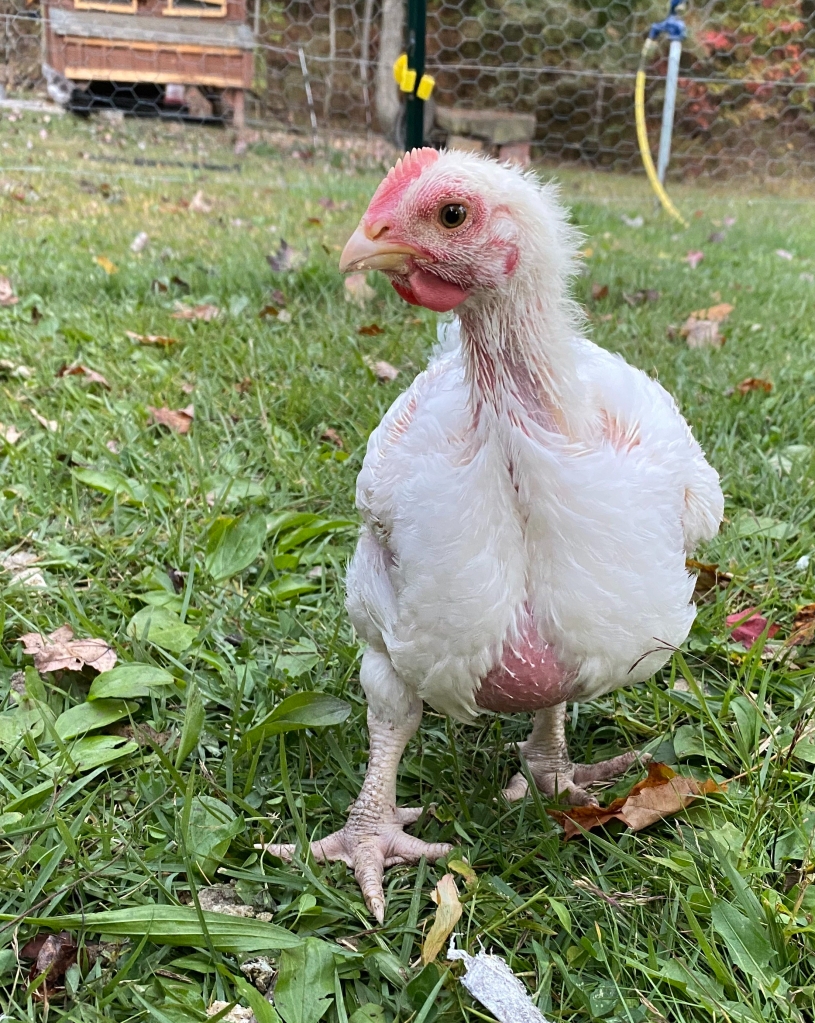
My family and I, and by family I mean mostly me, had thought about raising meat chickens for a few years, ever since we started with our laying flock. I never love the chicken we get from grocery stores. The quality is lacking, and we all know how sad the living conditions are for commercially raised meat chickens. The reservation which kept from taking the leap was neither my boyfriend nor myself had ever killed anything. Is that something we could emotionally manage? I think that’s the question many homesteaders face.
When we moved to Pennsylvania, we learned our neighbor is involved in the commercial poultry industry. He offered to give us some of the chicks that would have otherwise been euthanized. They always order extras to account for any losses. While this obviously doesn’t remove us very far from the commercial world given the source of the chicks, the fact remains that they were already alive, and would otherwise be put down if we didn’t take them. Our meat flock would also have access to the outdoors and a substantially larger run than they would have had.
We agreed to take 20 Cornish Cross, only because the neighbor said he has all the essential tools for processing the birds, and will assist us since it was our first time. What luck! On the day they arrived, we were told meat birds would normally spend their entire lives living on a wire-mesh floor.
We kept them for around 8-10 weeks, I can’t remember exactly how old they were. When the day arrived, the neighbor brought a trailer with all of the necessary supplies for butchering and processing. Supplies included: a frame for hanging the chickens for butchering, a stunning knife, a heated vat for scalding water, a plucker, tables for gutting, knives, and two trash cans: one for the guts, and one which was filled with ice, salt, a small capful of bleach, and water to hold and cool down the carcasses.
I wasn’t sure how well I would handle the butchering, emotionally. I’ve bawled like a baby when I’ve lost members of my laying flock, though most of the time their deaths have been traumatic, and I spend a lot of time with those birds. The meat chickens were different. They were getting so big they couldn’t go up the ramp to put themselves to bed. They drank about five gallons of water a day. They were a ton of work to constantly feed, water, and catch. In addition, they had started biting me, hard, when I did catch them to put them to bed. I was over it.
Unfortunately in terms of experience, my neighbor butchered all of them for me, but I stood by for the first four birds and felt only a little emotion over their death. This was their intended purpose. He first stunned them, then cut the carotid artery and the jugular, keeping the esophagus intact. He said this keeps the carcass cleaner overall when scalding and plucking them, and draining the blood immediately helps to maintain a higher quality of meat. The birds flapped and struggled for a minute, and it was all over.

After the birds’ movement had subsided, it was time to dunk them into the scalding water. The water was kept at 140 degrees and the birds were dunked for about 45 seconds. They were not dipped into ice water afterwards, as some people do. This process helps loosen the feathers for plucking. You can pluck them by hand or with a plucker. We used a feather plucker.

At this point in the process, I stopped taking photos. I didn’t know if I looked like a psychopath trying to take photos. I wish I had a video of the plucker in action. My neighbor, however, had snuck some photos and sent them to me. I had no idea!
After scalding, the birds went into the plucker, two at a time. It was incredible. The drum would spin while a water hose was attached and running. The water washed out the feathers as they were getting plucked. They were naked in a minute or less.

After plucking, it was time for gutting. We had to remove the head and feet first. We kept the feet and tossed the head. Next we had to cut open the abdomen near the vent (butthole for lack of a better term), and begin removing the organs. The intestines took up roughly 1/3 of the abdominal cavity. The kidneys were maybe the size of a quarter or a little larger, the gall bladder the size of a nickel, the lungs were the size of a dollar folded into 1/4ths. We discarded all of those organs. We kept the heart, liver, and gizzard. The gizzard is like the chicken’s stomach. The chicken will eat small pebbles which sit in the gizzard. The gizzard itself is a powerful muscle which contracts, squeezing the pebbles, and subsequently grinds the food. While I don’t have imagines of peeling the gizzard, that was something I learned: you have to peel the gizzard. As an aside, we live in coal country and nearly all of the “pebbles” in these birds’ gizzards were lumps of coal!


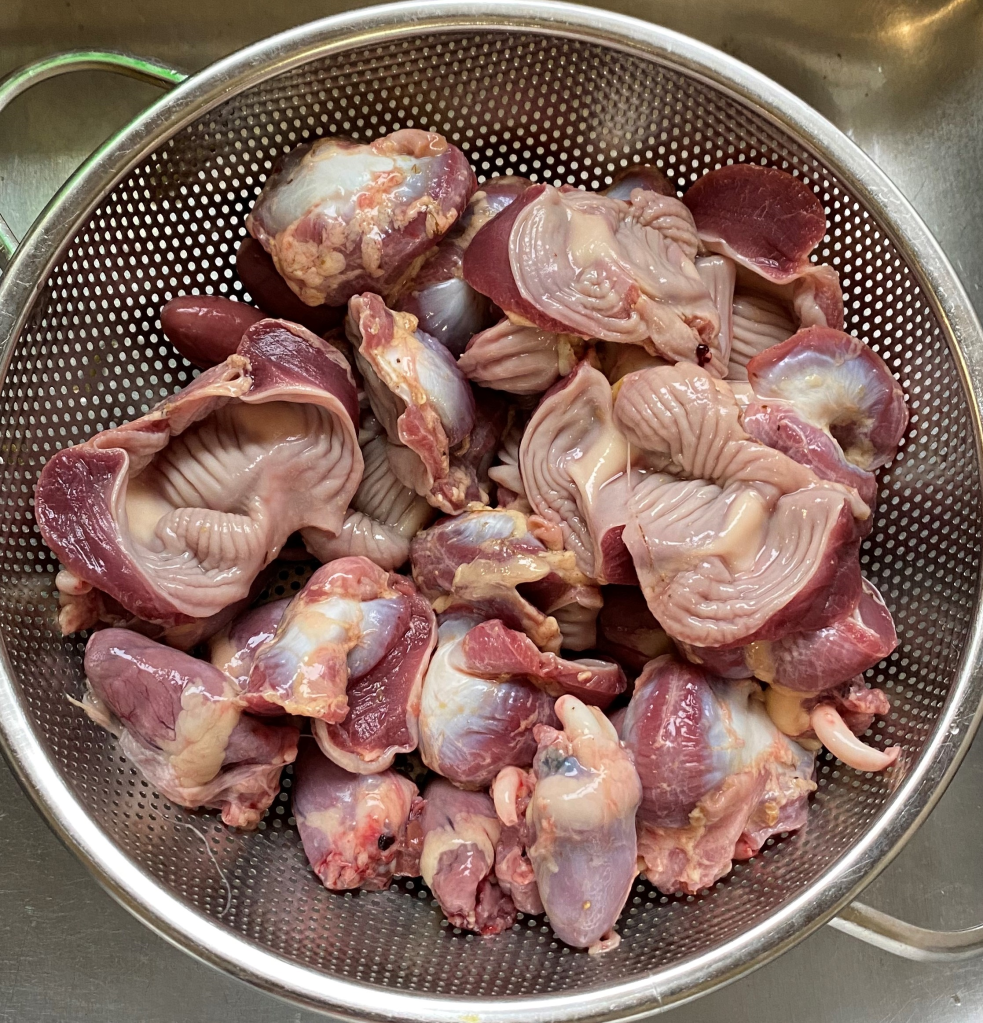

After processing, the birds were kept in the ice water brine for four hours, until their body temps had cooled. They were then put in bags and put in the fridge. Rigor mortis will set in after a few hours, so they birds are very rigid. If you would eat them at that point, the meat will be a bit tough or rubbery. After two days, some of the birds were still a little stiff, but on day three of the aging process they were limber like a grocery store chicken. I kept five birds whole, and carved the rest of them into breasts, whole legs, deboned thighs, drumsticks, wings, and tenders. I froze the carcasses for chicken broth, along with the gizzards, hearts, and half the livers. The first meal made with our chickens were fried chicken livers. This was the first time we had ever had livers and I was pleasantly surprised at their tenderness and red meat flavor.

I would say this process is bittersweet. We enjoyed the presence of the meat birds, but their time had come. It is very rewarding to know that we are making use of every component of the bird. We thanked them for what they gave us. Our freezers are full, and we shouldn’t need to buy chicken for at least six months. I absolutely believe we will do this again.

Stay tuned for the next post, in which I will go into detail about how to prep and use chicken feet! That was an adventure worthy of its own post.
Goldenrod Honey

Fall is quickly approaching, only a mere ten days away! The days are quickly becoming shorter and the nights just a touch cooler. If you walk close to our beehives, they are swarming with activity. Bees are always working hard to store their food for the winter, but you may notice something else about the hives: the smell. Late summer and early fall is goldenrod season. While spring dandelions are the primary pollen source for bees, goldenrod in is the primary nectar source in the fall. While goldenrod honey is delicious, the smell of the nectar is sour and pungent. I can often smell the hives from over a hundred feet away! I wanted to take a quick moment to talk about vital “weed,” goldenrod, its herbal benefits and the resulting goldenrod honey.

Benefits of Goldenrod
Goldenrod is not just a prevalent weed, it also has many benefits in herbal medicine. According to Healthline, Goldenrod is full of many “beneficial plant compounds, including saponins and flavonoid antioxidants like quercetin and kaempferol.” Both saponins and antioxidants are considered to inhibit growth of certain bacteria and fungus, and possess anti-cancer and anti-inflammatory properties. Significant research has shown goldenrod has more antioxidants than green tea! Check out the Healthline article for more information and a complete list of research references.
Goldenrod Honey
If goldenrod itself contains many useful properties, wouldn’t that mean that goldenrod honey is extra special? While most research has been focused on goldenrod itself, we already know honey contains lots of good-for-you properties. It is believed that honey takes on many of the properties from the plant from which it was sourced, meaning the benefits of the plant become benefits in the honey!
While the hive itself smells pungent during goldrenrod season, thankfully the honey is quite delicious with a deep amber, almost maple syrup color. As I quickly learned from the first year of harvesting goldenrod honey, this honey also crystallizes rapidly. That is the main reason my favorite mode of packaging honey is in small mason jars with a wide mouth for spooning.
Honey is also believed to be beneficial in reducing seasonal allergies, especially if the honey contains nectar sourced from the particular plant-allergen in question. While this has largely been thought to be a placebo effect, exposure therapy to reduce allergic reactions have shown some promise, particularly with peanut allergies. Always consult with your doctor before trying at-home or herbal treatment therapies, in most cases it certainly wouldn’t hurt to dip your spoon into a little honey.
Goldenrod Recipes
Chestnut School of Herbal Medicine has a well-written and well-researched article discussing goldenrod and its uses. In particular they include a recipe for Goldenrod Tea, which may be useful in treatment for UTI’s, and a Goldenrod Tincture, useful for allergies, colds, and sinus trouble.
Let me know if you have any questions, thoughts, comments or concerns.
What am I growing in Zone 6b?

I have had a garden for three years now. Every year I face new challenges and learn new things, but what hasn’t changed is the presence of my Master Seed List. You are free to check it out, but bear in mind it is sloppy and ever changing! I include a column each for the variety, amount I’d like to grow (a year’s supply for family of 2), when and how to plant based on the average last frost date, and plant spacing. It evolves every year but in choosing seeds I have several criteria in mind. I will keep this post up to date, and eventually I will add my garden diagram to the master seed list.
Criteria 1: Disease and/or Heat tolerant
Seeds and plants must be either or both disease or heat resistant, when applicable. Of course there is always room to assume some plants are neither particularly disease or heat resistant. Each year I’ve gardened, there have been heat waves in the high 90s, where many plants might struggle. A natural disease resistances also minimizes likelihood of losing a crop or the need for treating a disease.
Criteria 2: Organic, Heritage, and Open Air Pollinated
To be clear, all heritage strains are open-air pollinated, but not all open-air pollinated plants are heritage or organic. Essentially in the order as listed, I choose organic first, heritage when organic is unavailable, and open-air pollinated when neither organic nor heritage are available. While we all garden for different reasons, self-sustainability is important for me. I want to ensure that I can save seeds from my own plants for future sewing. Hybrids and plants that don’t pollinate well don’t lend themselves to reliable future offspring.
Criteria 3: Storage and Preservation
All varieties must be well suited to storage and preservation. For example, my primary tomato is a low-moisture Roma tomato which is excellent for making spaghetti sauce and other canned tomato products. I can’t give up my brandywine tomato though, so in order to save seeds I intend to alternate growing two plants of each variety enclosed in the greenhouse every other year. The onion I chose can be stored up to 12 months (a pungent yellow onion). All of my winter squash are suitable to 4-6 months of storage under the right conditions.
Criteria 4: Ability to Save Seeds
Many species will, of course, cross-pollinate. For example, do you grow both sweet and hot peppers? Because they are in the same botanical family, Capsicum annuum, they will cross pollinate. While the fruits in year one will be as they were intended, their offspring (grown from seeds from the fruits of year one) can have traits from any of the plants grown. Anyone up for a spicy bell pepper?
Gardeners are left with many choices in terms of seed-saving. You can simply grow one variety of every plant family, but of course, who wants to chose between a jalapeño or a bell pepper? Both have their utilities. Or, you can choose to hand pollinate. For some varieties it is easy to chose just one. I settled on one onion, one beet, and cucumbers won’t cross pollinate with melons or squash. Watermelons won’t even cross pollinate with other melons, like a muskmellon. So you are fairly safe if you only choose one variety of each. Unfortunately, simply spacing them apart doesn’t work as most varieties need 1/4 to one mile of distance to ensure cross pollination will not occur.
Squash is a fun topic on its own, as some squash won’t pollinate with others. There are three families of squash: cucurbita pepo, cucurbita moschata, and cucurbita maxima. They cannot cross pollinate with each other. For example, pattypan, acorn, zucchini, and others are in the C. pepo family, but butternut, falls in another, and so on. If one chooses to grow both zucchini and yellow squash, without hand pollination you couldn’t save their seeds as the resulting fruit from those seeds would likely be a cross. You could, however, choose a zucchini and a butternut, and they would not cross pollinate.
I am really not motivated at this point to try my hand at hand pollination, so I opted to choose only three squash varieties for 2021: A patty pan which is in the cucurbita pepo family, a Honeynut squash (Cucurbita moschata) and a Sweet Meat Winter Squash (Cucurbita maxima). Where is the zucchini you may ask? Well the patty pan is typically grown as a summer squash and can be used as a zucchini would in any recipe which calls for zucchini. If left on the plant, the squash will grow and form a tough skin making it suitable for long-term storage and can be eaten as a winter squash. See how that kills several birds with one stone? The honeynut squash is much like a smaller butternut squash and I love them in soups. The sweet meat winter squash is beautiful, and suitable for long term storage. In this way, all seeds will be true to form for next year!
Full disclosure: I have grown the honeynut squash with considerable success. I also grew spaghetti squash and a sugarpie pumpkin with enormous success. The plant was quite prolific. Sadly it is in the same family as all summer squash and I didn’t want to eliminate summer squash. I grew a jarrehdale pumpkin, but only had one pumpkin on one vine, and had several vines. My compromise to get a blue pumpkin is to grow the sweet meat winter squash, and hope that it is prolific! Because the seeds can last for several years and I get many more than I will grow, next year I will likely grow the sugerpie pumpkin anyways, and simply not save the seeds from the patty pan nor the sugarpie. if the sweet meat winter squash is a success, the sugarpie can go. Or I can grow it every other year and simply save seeds from the off year.
Criteria 5: Looks!
This applies primarily to the squash. I also chose my squash, after disease resistance and utility, based on looks. Since the squash needs to cure outside for 2-4 weeks, what better place to do it than on my front porch? This is what fall is all about. I also selected pretty popcorn, as it too, must spend some time curing and can do so while hanging prettily on my front porch.
What are you growing this year? Do you have any criteria for what you grow? Let me know in the comments.
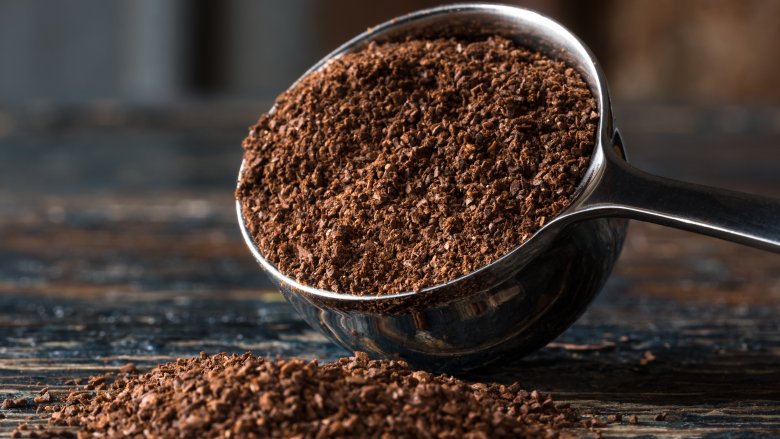
Using Coffee Grounds as Chicken Coop Bedding
A discussion about why I love using coffee grounds as chicken coop litter and how I’ve started obtaining and processing my own coffee grounds for free.
Sometime in February 2020 I wrote a post about why deep-litter composting doesn’t work for me. On Thanksgiving 2019 I installed a poop board lined with sweet PDZ, which I scooped daily, and the remaining coop and nesting boxes were lined with pine shavings. This was a substantial improvement in smell, moisture, mess, everything. By early February the pine shavings had broken down into dust and fine particles which lingered in the air. It was time to replace them.
When I went to Tractor Supply for more pine shavings, I found bags of Grounds coffee grounds litter. They were certainly pricier, at $10 a bag, but I decided to buy some. I needed 3 bags for my coop. Fast forward to today, five months later, and the coffee grounds have withstood the test of time with only one hiccup: eventually a lot of it gets lost from scooping stray poop and being kicked out of the coop, even with a small board at the doorways to prevent spillage. Sadly, the company selling the grounds stopped distributing them nationwide, and they are only available locally from Indianapolis. It also appears that their price has gone up.
The story of the Grounds litter is disappointing, but I want to continue using coffee grounds by collecting used grounds and drying them. I recently posted in Backyard Chickens about my love for coffee grounds and the post gained some interest. I wanted to address all of the questions I received on here, as well as talk about collecting and drying the grounds with the intent to update as I continue to learn.
Disclosure: Coop bedding and coop management are entirely personal choices, and can vary greatly based on experience, geographical location/climate, resources available, etc. To me, coffee is the best choice, but that doesn’t mean it has to be the best choice for you.

Why do I love coffee grounds as bedding?
Easy answer. My coop smells like breakfast! Coffee smells amazing in the coop, but the smell does fade over time. Either that, or I got used to it. Used grounds are given a second chance at life, and then a third chance when (or if) you dispose of them because they can be composted. The grounds are perfect for scooping like cat litter, and so I am able to remove most of the droppings from the coop on a daily basis. Coffee is lightweight and dust-free, so for this tiny homesteader, it is more manageable than sand, which also can’t be composted. If you collect your own used grounds, the bedding is also free! Who doesn’t love free?
Are coffee grounds safe for chickens to eat, and will they eat them?
This is the big question, the most common question, and the most debated question. In my experience chickens do not eat the used coffee grounds inside of their coop so toxicity has not been a concern of mine. I once dropped a full container of crumble in their bedding, and it was incredible watching the precision they have in picking the crumble from among the grounds.
As to whether it is safe to eat, that is a hot topic. Caffeine is a member of the methylxanthine family, and methylxanthines are potentially toxic to pets in certain quantities, but research is limited on chickens. I found various opinions online from bloggers, a couple stating that caffeine could be toxic to chickens (Raising Happy Chickens & Chicken and Chicks Information ). Hobby Farms states that coffee grounds shouldn’t be feed to chickens, but that coffee chaff makes acceptable bedding. Remember, chickens are not mammals, and mammals are the pets that most data is based upon in terms of toxicity.
I found only one official research article which included coffee as feed for chickens. The Inclusion of Coffee in Commercial Layer Diets, published in 2011, included 125 laying hens which were split into groups: a control, one fed 1.2% of their diet with caffeinated coffee (roughly 9 mg of caffeine per bird, considered a “moderate” amount), and the other fed a diet with 1.2% decaffeinated coffee. The study lasted between 21 and 35 weeks. The authors were assessing the affects coffee might have on the feed intake, egg production, and egg quality of commercial laying hens. What they found was there was no significant difference in feed intake, egg production, egg weight, egg mass, or feed conversion rate; however, egg shells were slightly thinner. They conclude by saying, “No scientific articles on feeding coffee to poultry were found, and therefore, further studies using coffee dregs, because it is a cheap byproduct and with economic potential, are recommended.” The unspoken conclusion here would be coffee does not appear toxic to chickens when consumed continuously in moderate amounts for a period of five to six months.
In reality, some bedding that we commonly use are also possibly toxic (I’m looking at you, pine shavings and straw), and yet farmers, backyard chicken keepers, and homesteaders continue to use them. I have been using coffee grounds in my coop for five months now to no ill-effects and will continue to use them. My chickens do not express any interest in eating the grounds, or if they have they have not had any objective health issues. Every chicken is different so my experiences may not align with yours. I think the economic potential of coffee dregs lies in it’s use as bedding, not feed.
Will coffee grounds stain the chickens feet/feathers/eggs, the concrete/floor?
In short, no. Dried grounds should not stain at all. I have plastic squares made to look like concrete underneath the people-door which collects grounds that fall when I open the door, and when it rains there has never been any staining, either. None of my little chicken feet, feathers, or eggs have been stained. Neither have my shoes or clothing from walking in the coop.
What do you use in their nesting boxes?
Pine shavings, but I don’t have any significant justification for this choice.
Will the coffee get in their water and seep color or caffeine into it?
I don’t keep my water in the coop because spillage regardless of bedding type has always been a mess. However, if coffee grounds did wind up in the water they would seep into the water slightly, as they’ve already been used. It’s unlikely to seep any significant amounts of caffeine into it, but even so, it is would be a good idea to refresh their water.
Can you use coffee as a deep compost litter?
This is not advisable, because as I recently learned coffee is considered a “green” compost material due to its high nitrogen content. Chicken manure is also high in nitrogen so you’d probably have a moldy stinky mess if you didn’t scoop the poop from the coffee.
Where can I get used coffee grounds?
I called Starbucks and asked them to save their used coffee. It is actually quite common for them to save coffee for people!
Since March I have also been saving my own morning grinds, about 1/4 a cup a day, by knocking them onto a plate. I simply stir them at night, and by the next day they are dry and I toss them into a container. I usually throw a week’s worth into the coop at a time to help replenish what is lost.
Does the size of the grind matter?
I can’t say with certainty. I started with was a course grind, and it works well, and I imagine a fine grind could be dustier. In fact, the Starbucks coffee I collect will have the espresso pucks tossed in. Espresso is a fine grind, so I toss most of the pucks straight into my garden, but there’s plenty of course grind in there from their drip coffee.
How do I dry the coffee grounds?
Drying is very important, because coffee grounds can mold. In the beginning I didn’t stir my drying coffee often enough and would find moldy clumps. That went straight to the compost!! I dry my personal coffee grounds on a plate in the kitchen. The Starbucks’ coffee I spread on a black plastic trash bag to dry in a thin layer and stir them once or twice a day until dry. I wouldn’t want to do this in the oven because of unnecessary energy and heat production, nor would I want to use my dehydrator because the coffee is too small and lightweight.

Please if you have any other questions or areas that you’d like me to expand upon, comment or email me at humble_hills_farm@yahoo.com. I hope you found this information useful.
Making a Sourdough Starter and Baking Your First Loaf of Sourdough

With the advent of Covid-19 there’s been a shortage of yeast and a rise of folks asking for sourdough starter. My Facebook feed has been awash with posts regarding sourdough, and thus far I’ve mailed starter to one person, and have had two others email me about sourdough! I’d love to write this gorgeous detailed post with all of the dos and don’ts of sourdough, but I am not an expert. I spent two years baking sourdough baguettes before letting my starter die, and taking a four year hiatus. Now I’m back, and have been using a new starter for two years. Rather than pretend I am an expert, I wanted to share with you the resources I’ve used along the way, interspersed with some of my own tips. One key thing to remember with sourdough is each starter will differ in yeast cultures, will have varying rates of activity, smells, and tastes, so don’t be discouraged when you first get started and your experience isn’t the same as someone else’s.
Making a starter is easy, and if you’ve got the patience, you should have a bubbly active starter between seven and fourteen days. If you’re impatient, you can order some online, but between ordering it, waiting for it to ship, and taking several days to feed and revive it, you’re still looking at a week to use it. I should also mention that sourdough starters can take on the yeasts from it’s environment, so don’t spend top dollar on a San Fransisco sourdough starter and expect it to be the same starter a year form now! It will be “Insert your location’s name” starter. (At the time of writing, I am working on obtaining the official source for this information.) Did you know most starters have yeasts that are predominate on the baker’s hands that made it? So every traditionally baked sourdough will contain a little piece of the baker that made it! Made with love ❤
As an aside: I am obtaining a dehydrator on Monday which will allow me to dehydrate “living foods,” and I can start shipping my starter in earnest! Email me at humble_hills_farm@yahoo.com for info!
Making a Starter
I religiously use King Arthur for many of my bread recipes, including how to make a starter! Here is King Arthur’s Sourdough Starter Recipe. While I followed the methodology in its entirety, I halved ingredients from the beginning and fed using 50 grams of water and 50 grams of flour, and that is still the feed ratio I use today. I felt it was a tad less wasteful, especially in the early days when you must discard starter. Do not bake with starter discard that is in the early stages of developing or it will have an off taste. There was a good two days in the first week where mine smelled like athlete’s foot! Off smells are normal as the yeasts and bacteria are sorting themselves out. By the second week, mine developed a lovely yeasty aroma much like yeast breads you’re familiar with. I started mine in a mason jar covered with a reusable lid twisted down only enough to keep it from being knocked off. Please, please, please use a kitchen scale. Measurement by volume is wildly inaccurate, and even when looking at weights, grams are more accurate than ounces (1/10 of an ounce is equal to 4 grams). Finally, whenever possible stick with unbleached flours and filtered water (I use water from my Brita filter).
After a week or two, when that heavenly yeasty aroma is present, and you can feed your starter and it reliably bulks up, nearly doubling in volume, your starter is ready. At this point, you can either feed it daily (although depending on the starter and how warm your kitchen is, some folks report needing to feed twice daily), or pop it in your fridge and take it out to feed it once a week. If it’s been refrigerated and you want to bake with it, it’s not a bad idea to plan to feed it twice to make sure it’s nice and active. If you choose to not refrigerate it, you’ll find you soon have more starter than what you know to do with! If you’re feeding it daily, you either need to use up at least half the starter in a recipe, or discard half the starter prior to feeding. You use well fed and active starter for bread recipes. For “discard” recipes you’re using the inactive, unfed starter that is tossed before feeding.
Personally I try to keep only a small amount of starter to limit any discarding so that I never have to discard or feel pressured to bake with any discard, but that kind of management takes practice and is based on how often and what you like to bake. I keep roughly 1/4 of a cup, and feed 50 grams of water and 50 grams of unbleached white flour or a blend of 50/50 whole wheat and white flour. At this point, I know how much starter I will need for each recipe and plan feedings accordingly.
For example, the recipe I use the most calls for 227 grams of sourdough starter. If I feed my small 1/4 cup amount with 50 grams each of water and flour, that’s only 100 grams, so I usually feed it twice equaling 200 grams. This means I’m always short 27 added grams, so every couple of weeks, I’ll also feed it after I remove the 227 grams of starter, to add back an extra 100 total grams of flour and water. My preferred recipe using 227 grams, but some may use as little as 27 grams of starter! If I’ve decided I only wanted a small amount I’d only need to feed it once, and plan future feedings around the fact that I have a small excess. I’ve learned this naturally in time, but in writing this post I found that King Arthur has a guide for this too! They explain things so much better than I do: A Smaller Sourdough Starter.
So after using your starter, you can either feed it again, or pop it straight in the fridge to take out and feed within a week. If it has been refrigerated, it will take longer to become active post feeding if you plan on using it. If you want to put it back in the fridge, you still need to give it at least four hours to actually eat some of the feed before putting it back in the fridge. Here is more info on feeding and maintaining your starter.
Baking Your Bread
Making the starter is the easiest part. For me the challenge has been baking that perfect loaf! A recipe is only as good as the technique you use for rising, shaping, and baking. Over the years I’ve used different rise times, rising techniques, and baking techniques, and I’ve used most of them with great success! Your methods should ultimately come down to what you have available in your home. There’s rarely a need to go buy fancy tools if you don’t want to!
The First Rise
After weighing out and mixing your ingredients for a good three or four minutes, cover your bowl and let it sit for about thirty minutes and knead again for another few minutes. If a recipe calls for mixing all but the starter and salt, followed a rest, before adding remaining ingredients and kneading, this known as autolyse. For myself, I find mixing it all at once is and letting it rest before kneading again is the easiest, but opinions differ as to which method is best. Regardless allowing the dough to rest, you’re largely eliminating the need for a long kneading period. Over kneading can result in a bread lacking in flavor and poor crumb quality.
After kneading the second time cover the bowl, and allow the bread to rise. Unlike with commercial yeast, it’s rare for sourdough to double in size, but it should still be noticeably larger. During this period, you have the option to perform a series of stretch and folds to improve the strength and integrity of the dough. This is basically grabbing the dough, pulling it, and folding it in half a couple of times. It can take sourdough anywhere from four to eight hours to achieve a good rise.
Some recipes may instruct you to place the dough in the fridge for a longer ferment time. This will increase the tanginess of the final bread product. Some recipes may recommend this during the first or the second rise after the dough has been shaped. I have not practiced this much because I am impatient.
Shaping the Loaf
Once your dough has risen it’s time to shape the dough for its second rise. There are many ways to shape and bake your loaf. I prefer the classic boule. Here is King Arthur’s guide to shaping a boule.
Using a Proofing Basket and Transferring Bread to the Oven
My preferred rising method is a proofing basket. Don’t have one? That’s okay. I line a small round colander with a flour sack dish towel which has been heavily seasoned with flour. To do this, lay your towel flat and massage some flour into it. Gently lift it, place it into your colander, and sprinkle with a little more flour. The amount needed takes some practice, but you want enough that your dough doesn’t stick to the fabric, but not so much that your bread is completely encrusted with flour. Now take your shaped boule and place it seam side up in the proofing basket. This is done so that when you flip the bread out of the basket, the seam will be down for baking.
Once it’s in the basket, let it rise for three to four hours or until the dough has increased in size.
Once it’s reading for baking if you go to remove it from the flour sack towel and the dough is sticky, just gently work the fabric away from the dough. Most of the times it’s not a disaster!
There are so many ways to bake the bread, so King Arthur also has an excellent guide for three methods of transferring your dough to a baking vessel. I’ve used all three with success, but unfortunately for me I found their article after learning through trial and a lot of error.

Scoring the Bread
Before popping your bread in the oven, you need to score it. Scoring is cutting the length of the bread to encourage steam to escape where you want it to. If you don’t score the bread, chances are the steam will build and cause a blow out in which your bread is grotesquely misshapen. It would still be edible though! Once again King Arthur comes to the rescue with the article on how to score bread. Another disclosure: I don’t use a fancy scoring knife, which does limit my cuts to a simple “X”. I simply sharpen my kitchen knife, spritz a bit of oil on it, and make the cut. You’ll never achieve the same results, but I feel my loaves are just as lovely. Scoring blades unfortunately dull quickly so this is my personal choice on the matter.
Steam in Bread Baking
Have you ever noticed how store bought bakery loaves have lovely little blistery bubbles all over the bread and have an earth shattering crunch when you bite in to them? To achieve this type of crust you need steam. Hands down the best way I’ve found for achieving this is to bake the bread in an enclosed capsule, either a dutch oven or a baking stone covered with a cast iron pot. King Arthur has a great article for achieving steam in your home oven, including the dutch oven method. I usually modify any recipe to accommodate the dutch oven baking method!
Basic Bread Recipe
So now that you’ve made it this far, here’s the recipe I use the most often: Extra-Tangy Sourdough Bread. For your first few loaves, or a small household, I recommend cutting the recipe in half that way it’s not a total loss if you blunder up your first attempt. I’m two years deep, and I’ve made a lot of blunder loaves! All still edible though, no worries. This recipe is highly flexible, and I often increase the whole wheat. Increasing the whole wheat absorbs more moisture, making a drier bread, so I strongly recommend sticking with the recipe until you get familiar with it. When you’re comfortable, then you can start making minor adjustments.
My starter prefers a longer rise time so typically I take my starter out of the fridge on Saturday morning, feed it and feed it again before bed around 9:30 PM. On Sunday morning I wake up, mix my bread, and I let it rise for six to eight hours. The dough is usually mixed around 7 AM. I typically perform series of stretch and folds 1-2 hours. This is optional but helps build better dough strength. Around 2 to 3 PM the dough is shaped and placed in the proofing basket. Around 6 to 7 PM the dough is ready for the oven! Yes, we eat dinner late! Alternatively you can let your dough rise overnight, you just won’t be able to do the stretch and folds. Really, it’s fine. You won’t notice much of a difference! I typically bake on a baking stone preheated to 450 degrees F and covered with a dutch oven which was also preheated. Please don’t set a cold dutch oven on a hot baking stone or you will have regrets! Bake at 450 covered for 15 minutes and uncovered for 10-15 minutes. Don’t forget to let your bread cool! This allows the flavors to really develop. Finally, ENJOY the fruits of your labor!

Final Thoughts
The reality is no two starters are the same. What works for me may not work for you. Don’t get discouraged if you goof, just learn and move on! There is a reason why commercial yeast became popular: it’s consistent! Sourdough isn’t consistent and takes a lot of pre-planning, but boy is the end result worth it!
I’ve never written anything like this. Sourdough is almost a world of its own and there is so much research out there! If you would like me to clarify, elaborate, or answer any questions, please feel free to comment or shoot me an e-mail. I feel this post is like a painting: the work is never really done!
A Protein, Fat, and Cost Calculator for Homemade Chicken Feed

Click HERE to view the calculator. Please read the instructions tab on the spreadsheet to learn how to download a copy for personal use. I will not respond to requests to edit the document.
This year I have decided to grow a few items that could be used to feed my chickens. It is doubtful I am growing enough for more than 1-2 months of feed, but I wanted to ensure the things I am growing can be grown and harvested successfully. In planning what to grow, I had to plan in advance what I can incorporate into the feed and still provide balanced nutrition, so that means I need to formulate feed ratios before I begin growing.
There are many poultry feed recipes available online, but few of them incorporated what I am capable of growing in my region. For example, lentils, amaranth, buckwheat, corn, peas, sunflower seeds, and soybeans all grow well in Zone 6B. Wheat, rye, quinoa, sesame seed, and flax seed typically do not, and these are frequent flyers on many ingredient lists. What is available online does not typically work for my region. To calculate my own recipe, I needed a tool to “plug and play” ingredients to reach a desirable protein and fat content. However, many tools I found did not contain the ingredients I was interested in using, were difficult to edit, overly complex, or geared to the wrong breed of animal.
With inspiration from some nutrition calculators I’ve found, I decided to make my own to suit my needs. My math skills were a little rusty so a friend volunteered to help with some of the formulas and more complex Excel editing, but I couldn’t be more thrilled with the outcome and the solid collaboration.
The tool contains three pages. The first is an instruction page, the second is the fat and protein calculator, and the third page is the cost calculator. The Nutrition Calculator is linked to the Cost Calculator, so if you enter in the quantities desired ingredient weight in the Nutrition Calculator they auto-populate in the Cost Calculator so you only need to enter your information once instead of switching back and forth. Entries into the Cost Calculator do not carry over to the Nutrition Calculator. In the Nutrition Calculator I have put a lot of time into researching the fat and protein levels of each ingredient, but keep in mind these numbers can vary based on the source, but also based on the method, location, and soil quality in which the products were grown. In the Cost Calculator, I have hyperlinked to the most affordable items I could find in bulk. Feel free to find your own product source, but adjust the unit weight and cost accordingly, and make sure the ingredient lists in both worksheets are identical so the auto-populate feature would work.
Modern day chickens live years longer than their ancestors and a large reason is because we have gotten their nutrition needs down to a near-exact science. I am absolutely not an expert in animal or poultry nutrition, and chances are neither are you. If you decide to mix your own feed, it is critical to understand the basic nutritional needs of your animals to ensure they are as healthy as possible. It is important to incorporate a wide range of grains, seeds, and legumes to ensure a variety of nutrients, and amino acids. Any time you mix your own feed, you could be taking a risk. Please do your research on each ingredient before including it. Ensure it is safe for the animals to eat, and check if the ingredients need any special processing before feeding. Finally, ensure that all essential amino acids are present. Generally speaking, a well balanced feed should also meet the protein and fat targets for your desired poultry: starter, grower, layer, or broiler.
Examples of foods that are safe, but need extra processing include amaranth and quinoa. Both foods contain anti-nutrients which affect proper nutrient absorption when ingested. To reduce the anti-nutrients, amaranth should be cooked or toasted before use and quinoa must be washed to remove the bitter saponin. According to some sources, neither amaranth nor quinoa should make up more than 15% of poultry feed. However both of these grains, along with buckwheat, are among the few grains that contain high amounts of Lysine, an essential amino acid for chickens. While wheat contains relatively low amounts, durum wheat contains more Lysine than soft wheat. For laying hens it is also critical to provide free choice crushed egg shells or oyster shells for calcium. For poultry unable to free range, free-range grit must also be made available. Those tips are by no means comprehensive so please do your own research before formulating your own poultry feed.
Make no mistake: unless you grow the majority of your own feed, it will likely cost more to make your own than to buy pre-mixed feed. It costs me $22 to buy a 40 pound bag of organic feed at Tractor Supply. The cheapest formula I could make, without growing my own feed, equaled around $31.48 and comprised of barley, brewers yeast, corn, flax seed, lentils, millet, oats, peas, sunflower seeds, and soft and durum wheat. It totaled 16.2% protein and 4.2% fat, which is on target for layer or grower feed. That’s not too bad, but to get that price I had to factor in Tractor Supply’s corn, oats, and black oil sunflower seeds. If you’re wanting to stick with organic and non-GMO, the price increases to $34.55 for 40 pounds, which was only a small increase, and both prices were more expensive than the scientifically formulated organic feed from Tractor Supply.
Excel Spreadsheet: Protein, Fat, and Cost Calculator for Chicken Feed
Now that you have made it this far I’m gonna hit you with the link again, CLICK HERE for the to view calculator. This is a link to Google Spreadsheet. You cannot edit it as is, but you can download it as an Excel sheet and then begin editing. Happy Chickening! Please feel free to comment with any feedback, comments or questions.
Other Useful websites:
https://extension.uga.edu/publications/detail.html?number=C954
https://eorganic.org/node/8107
http://afs.ca.uky.edu/poultry
Preparing Your Pantry and Meals in an Emergency

During this time of uncertainty, it has became clear than many of us are unprepared for an emergency. Many of us have simply never had to be prepared. As current events unfold, I have watched as people have flocked to stores to stock up on supplies, and I have seen many resources recommending various goods to buy, but not necessarily instructions on how to use these foods. Many recommendations ignore produce altogether, but there are some produce goods with a long shelf life! I’d like to provide a resource of recommended goods and resources that you can use when preparing for the future, whatever it may be.
If you are not currently prepared, please DO NOT buy more than two weeks of food at a time. While this seems counter intuitive and many of us are panicking, it is important to remember that folks who are living paycheck to paycheck, or perhaps rely on rides from others, are simply unable to buy food in large quantities or in a timely manner. If all of the food is gone, there will be individuals and families forced to go without food.
During this time of a true global pandemic, it is critically important not only to practice good hygiene, but good health. You must exercise, even if it is a few short walks a day in the sunshine. You must eat healthy. If you are in poor health, you are significantly more susceptible to getting sick and more likely to struggle to recover. When stocking up please plan for healthy, nutritious foods, but be careful to buy foods you like, because if you don’t like it you won’t want to eat it. Finally, even though we must focus on health, I still encourage you to get some snack items. There is no need to deprive us of things that give us joy, especially when we are encouraged to socially isolate ourselves. The least we can do is enjoy a tasty Oreo for dessert.
I also recommend buying some “sick foods” in the event that you do get sick, get some easy to eat foods such as pudding, jello, chicken broth, noodles. It’s better to be prepared than without. Of course, don’t forget essential medications and pet foods as well.
Pantry Items
Fresh Produce
There are many items that have a long shelf life that are also considered fresh produce. Some of these can be kept in a refrigerator for up to a month and others can be safely stored without refrigeration for several months.
Items that store well without refrigeration, preferably in a cool dark location such as a basement, garage, cellar, or unheated pantry:
- Winter squash (acorn squash, honeynut squash, butternut squash, spaghetti squash, pumpkins, etc.)
- Potatoes (Red Chieftain, Yukon Gold, Burbank Russet, German Butterball, Yukon Gem, are all varieties prone to the longest shelf life among potatoes)
- Sweet Potatoes/Yams
- Whole, unpeeled onions (yellow onions are best if buying from the grocery store but there are many great heirloom varieties)
- Garlic (whole head, unpeeled)
Items that store for 1-2 months with refrigeration, but can also store well for 2-4 weeks in a cool basement, garage or cellar:
- Apples (Fuji, Gala, Golden Delicious, Goldrush, Granny Smith, Honeycrisps, Ida Red, McIntosh, and Red Delicious are good storage varieties)
- Carrots
- Beets
- Cabbage
- Citrus (oranges, lemons, lime)
- Homemade fermented foods (sauerkraut, kimchi, pickles, beets, chutney)
- Eggs (See my article on How to Store Farm Fresh Eggs for comprehensive information, if using farm fresh can be stored for no more than two weeks in cool location)
- Parmesan, unopened (can be stored in cold basement or cellar)
Non-Perishable Shelf-Stable Pantry Items
These items all store well, often for years, with no need to refrigerate. Many of these foods can also be prepared with minimal cooking, in the event of a power outage.
- Oil
- Butter (yes, this is shelf stable but I recommend refrigerating)
- Rice (preferably brown for added protein, fiber, and vitamins)
- Quinoa
- Corn meal & Corn Muffin Mix (Jiffy has been my BFF)
- Barley
- Oatmeal
- Flour
- Sugar, honey, molasses, and (when refrigerated) maple syrup
- Yeast
- Dried Milk (This is also great for that uh-oh moment when you realize the milk you need ASAP has spoiled!)
- Powdered eggs (good for baking)
- Instant mashed potatoes
- Vanilla extract
- Nuts (walnuts, almonds, pecans, or whatever you prefer)
- Jerky
- Summer Sausages
- Pre-cooked bacon
- Dried or freeze-dried fruits
- Raisins
- Dried beans
- Pasta (preferably whole wheat)
- Ramen noodles (yes, I really said that)
- Salt (Kosher preferably because table salt contains iodine which has some undesirable interactions with preserving foods)
- Pepper, and your favorite herbs and spices (I recommend some taco seasoning)
- Bouillon cubes
- Boxed or canned broth/stocks
- Boxed milk (I prefer soy to dairy milk if going this route but it’s personal preference)
- Spaghetti or marinara sauce
- Canned tomatoes (get numerous varieties)
- Canned veggies
- Canned soups
- Canned chicken, tuna, and salmon
- Canned taco filling (yes, it’s a thing!)
- Canned beans
- Canned coconut milk
- Canned cream of “whatever” (cream of chicken, celery, mushroom, etc)
- Canned fruits (not my favorite due to high sugar content)
- Canned salsas
- Coffee/tea & and shelf stable creamers
- Apple sauce (individual serving sizes)
- Jello
- Popcorn
- Chocolate (I like a variety of snacking chocolate and chocolate chips for baking)
- Your favorite snacks, crackers, chips, etc
Freezer Items
I am actually not a big advocate of keeping a large supply of freezer items available, especially if you do not have a back up source of power in the event of a power outage. I do not have a back up source of power, so I limited my frozen goods to only a week’s supply. In the event of a power outage, many foods are only safe for four hours if they were refrigerated. Foodsafety.gov has a complete list of foods that are safe to keep, or should be thrown out if you lose power. Many frozen foods can be kept for a day as they thaw, and can be cooked or preserved within that time frame.
- Bread (yes, you can freeze your bread, and in the event of a power outage, it would still keep for a couple of weeks)
- Shredded cheeses
- Frozen vegetables
- Frozen fruit
- Frozen meat
- Pre-made meals that you enjoy (we all feel a little lazy sometimes)
- Ice cream or other tasty treats
Grow it Yourself
Here are some suggestions for growing things in a nice sunny window. We may not all have a garden, but most of us have a window with 4-6 hours of sunlight:
- Potted herbs (especially basil and cilantro which are quick and easy to grow but most any herb can be grown in a pot)
- Regrowing green onions
- Sprouted seeds/grains
- Lettuce (only if you have a lot of windows since this is a relatively low calorie item)
- Radishes (Radishes are one of the easiest, fastest growing veggies. They adapt very well to shallow, poor soil and can be ready to harvest in as little as three weeks)
Recipes
Many, if not most recipes can be adapted in some way to a “pantry recipe,” but certainly some are better suited to the task than others. In addition to a few of my personal recipes, I would like to provide links to some of my favorite recipes. Many ideas range in difficulty from ultra-easy to kind of swanky.
- My favorite blog Budget Bytes recently published a blog post including 15 of her most adaptable Pantry Recipes for emergencies. Particular favorites that I have used on rotation are the Poor Man’s Burrito Bowl, Pumpkin (or butternut squash) and Red Lentil Soup, Simple Homemade Chilli, and Garlic Noodles with Beef and Broccoli.
- Tuna noodle casserole: This one of course is an easy classic many of us have grown up eating. It is easily adaptable, for example substituting dried milk and canned peas, or frozen mixed veggies, in place of fresh or frozen.
- Spaghetti with marinara sauce and meatballs: This goes without a recipe I think. I have several packs of store bought meatballs sitting in the freezer, but you could omit the meatballs or substitute summer sausage in a pinch.
- Homemade pizza: My favorite homemade crust is a No Knead Crust from Serious Eats. Many pizza toppings are very shelf stable, such as pepperoni, canned mushrooms, the sauce, etc.
- Salmon Patties: You could easily substitute powdered eggs for a 100% shelf-stable meal with a side of rice/quinoa/potatoes, and a veggie.
- Tuna Mac N Cheese: Mix canned tuna with a box of cooked mac n cheese. Stir in some peas for a nutritional bump.
- Tacos: If you have canned taco filling, frozen or refrigerated cheese, salsa and some taco shells, you’ve got yourself a decent meal. Throw in an apple for a side!
- Red Beans and Rice: This has been a pantry staple recipe for me for almost ten years. Celery can keep for a few weeks in the fridge, and I usually have frozen diced bell peppers on hand, but in an emergency you could skip both and still have a delicious meal.
- Snack lunch: Make a smörgåsbord of cheeses, dried meats, crackers, and sliced apples for an easy and delicious lunch.
- Vegetable Bean & Barley Soup: This is an extremely flexible recipe and a favorite of mine for a “pantry round up” day. Other veggies you could add are potatoes, kidney beans instead of white or pinto beans, peas, etc..
- Potato soup
- Black been and sweet potato soup
- Chicken noodle soup
- Unstuffed Cabbage Roll Soup
Potato Soup
Ingredients
- 4 large or 6 small potatoes, peeled and diced
- 6-8 slices of uncooked bacon, diced
- 3 tablespoons reserved bacon fat*
- 2 carrots, sliced
- 1 large onion
- 4 garlic cloves, minced
- 1 to 1.5 teaspoons of salt, adjust to taste
- 1/4 to 1/2 teaspoon of black pepper, adjust to taste
- 1/4 cup flour
- 4 cups chicken broth
- 2 cups milk, preferably whole milk*
- 1/2 cup frozen peas, optional
- Optional add-ins: sliced green onions, sliced chives, sour cream, shredded cheese
Instructions
- In a separate skillet, fry diced bacon pieces over medium until crispy. Set aside roughly three tablespoons of bacon fat.
- Place reserved bacon fat in Dutch Oven or stock pot over medium-high heat. Add onion and carrots and cook until tender (roughly 5 minutes).
- Add garlic, one teaspoon of salt, and 1/4 teaspoon pepper and cook an additional 30 seconds. If needed, more salt can be added at the end of cooking.
- Sprinkle the flour over the onion, carrot, and garlic mixture. Stir.
- Add chicken broth, and stir until flour is well incorporated.
- Add potatoes and milk.
- Bring to boil and reduce to simmer, cooking until potatoes are tender when pierced with a fork (roughly 10-15 minutes).
- If using, add in peas during the last 30 seconds of cooking.
- This is optional, but you can use an immersion blender to puree a portion of the soup. Taste for salt and pepper, adding more if needed.
- Ladle the soup into bowls and top with bacon pieces and any additional toppings.
- Serve with a side of cornbread or crackers.
*You can use pre-cooked bacon. This will mean skipping step one, which will not yield any bacon fat. Feel free to sub butter or oil for the bacon fat. For the milk, whole milk is preferred. If using dried milk, this is typically nonfat and I recommend doubling the powder to water ratio for a creamier milk.
Black Beans, Sweet Potato, and Kale Soup*
Ingredients
- 2 tablespoons oil
- 1 large onion, diced
- 4 garlic cloves, minced
- 1 1/2 teaspoon cumin
- 1 teaspoon paprika
- 1/2 teaspoon black pepper
- 1/8-1/4 teaspoon cayenne
- 1/2 teaspoon salt
- 1-2 sweet potatoes, cubed (roughly 3 cups)
- 1 15-ounce can black beans
- 1 can Ro-tel, undrained
- 4 cups vegetable or chicken broth
- 4 cups kale, torn into small pieces**
- 1 lime (optional but strongly encouraged; bottled lime juice is a good substitute)
- 1/4 cup minced cilantro (optional)
- 2 green onions, sliced (optional)
- Shredded cheese or sourcream (optional)
Instructions
- In a large pot or dutch oven, heat oil over medium-high heat. Add onions and saute for roughly 5 minutes.
- Add garlic and saute an additional 30 seconds.
- Add spices and stir until incorporated
- Add sweet potatoes, Ro-tel, black beans, and broth. Bring to a boil, reducing to a simmer, and simmer for roughly 15 minutes, or until sweet potatoes are tender.
- Stir in kale and simmer an additional 1-2 minutes.
- Add in juice from lime.
- Ladle soup into bowls and top with any additional add-ins.
- Serve with a side of fresh bread, rolls, or corn bread.
*This recipe was inspired from one that I memorized a long time ago. I believe it had came from a vegetarian cookbook I pulled from my local library. It is not my intention to plagiarize it in anyways, but I could not find the original source.
** You could substitute fresh or frozen spinach, or sliced cabbage. If using cabbage, use roughly 2-3 cups and cook for an additional five minutes. In an emergency, this could be omitted entirely.
Chicken Noodle Soup
Ingredients
- 2 tablespoons butter, oil, or chicken fat
- 1 large onion, diced
- 2 stalks celery, diced
- 2 carrots, diced
- 4 garlic cloves, minced
- 1 teaspoon dried thyme
- 1/2 teaspoon dried basil,
- 1/2 teaspoon dried oregano
- 4 cups chicken broth, preferably homemade
- 2-3 cups diced cooked chicken (I usually use leftover chicken, rotisserie, or canned chicken in a pinch)
- 1.5 cups egg noodles
- salt and pepper, to taste
- Parsley, minced (optional)
Instructions
- In a large pot over medium-high heat heat butter or oil. Cook onion and celery and carrots for 5-6 minutes.
- Add garlic and saute another 30 seconds.
- Add thyme, basil, and oregano, and stir until incorporated.
- Add chicken broth and bring to boil. Reduce heat to simmer for roughly ten minutes.
- Add chicken and noodles, bringing back to a simmer and cook until noodles are done according to packaging, usually 6-7 minutes.
- Turn off heat and stir in parsley and taste for salt and pepper.
Unstuffed Cabbage Roll Soup
Ingredients
- 2 tablespoons oil
- 4 garlic cloves, minced
- 1 large onion, dinced
- 1 pound ground turkey or beef
- 1/2 teaspoon dried oregano
- 1 teaspoon salt
- 1 teaspoon pepper
- 16 ounces marinara sauce
- 1 cup cooked rice (preferably brown)
- 4 cups chicken or beef broth
- 6-8 cups sliced/shredded cabbage (for a shortcut buy a bag of cabbage for coleslaw)
- 1 tablespoon lemon juice, optional
- Minced parsley, optional
Instructions
- Heat oil on medium-high heat.
- Add onions and cook roughly five minutes.
- Add ground beef or turkey and cook until 90-95% done.
- Add garlic and stir an additional 30 seconds.
- Add seasonings and stir until incorporated.
- Add marinara, cooked rice, cabbage, and chicken or beef broth.
- Bring to boil and reduce to simmer for roughly 15-20 minutes.
- Turn off heat and stir in lemon juice and parsley if using.
- Serve with some rolls or crusty bread.
Please feel free to comment with any questions or additional meal ideas. I would love to hear them! In the mean time, stay safe everyone. Wash your hands. Reach out to your loved ones and make sure they have everything they need and are doing okay.
Fermenting Your Own Ginger Ale with Wild Yeasts
I know lengthy recipe posts can be a droll, but if you’ve never made your own fermented beverage, it is essential to know a little before you get started! This post is for the beginner and I hope you enjoy!
Before Co2 carbonation, the only drinks historically carbonated were beers and wines. This is because Co2 is a byproduct of fermentation, and when trapped inside the fermentation vessel, the beverage stays carbonated. It is entirely possible to replicate this process at home by making your own fermented and (mostly) non-alcoholic sodas. I say mostly because, much like vinegar, there are trace amounts of alcohol produced by the fermentation process, but the amount is minuscule compared to a traditional alcoholic drink.
In the modern era, we have commercialized yeast to make stable, consistently flavored beers and wines, but before commercialized yeast all drinks were made using wild yeasts, which can be captured by numerous methods. One method used to make homemade sodas is to make a ginger bug. This is made much like a sourdough starter for bread, except the base ingredients are water, ginger, and sugar. Daily, equal parts ginger and sugar are added to the ginger bug. Wild yeasts occur naturally on ginger and so ginger bugs are ready fairly quickly. After 7-14 days of feeding and nurturing your ginger bug with daily feedings of ginger and sugar, you’ll have a bubbly, gingery, alcoholic-smelling soda starter. This starter is then added to your soda base, bottled up, and left to ferment for a couple of days to ensure a nice fizzy drink.
I initially wanted to try fermenting my own sodas because I was curious, but along the way I have come to love the process for so many reasons. First, I feel a bit like a mad scientist brewing up interesting concoctions. Because the sodas are carbonated using fermentation (wild yeasts), they contain live active probiotics. The sodas typically use less sugar, which I prefer the taste of, but you are making this for yourself so you can use more or less to suite your tastes. The ingredients are real and very fresh, so unlike regular soda, there is some nutritional benefit aside from the probiotics. Finally, if you’re concerned at all about your carbon footprint, making your own soda is a little- to no-waste means of making a tasty drink, with no bottle or can to add to the garbage bin afterwards.
There are numerous websites and books which instruct you to make a ginger bug. Some add equal parts water, sugar, and ginger daily, and some start with a set amount of liquid and add only sugar and ginger daily. I have tried both, and both work great. Using a set amount of liquid is a bit easier though. The ingredients types also vary slightly in terms of water filtration, sugar types, and organic vs non-organic ginger and sugar. Again, I’ve used a combination of all various of ingredient types with no noticeable affect on outcome.
To Make the Ginger Bug
I had made a ginger bug years ago, but eventually gave up. Sometime last year I decided to try again and I used the Ginger Bug recipe from Nourished Kitchen. I use organic ginger (unpeeled), water filtered with a Brita pitcher filter, and plain white sugar. Many folks will tell you that you can store your dormant ginger bug in the fridge, taking it out once a week for a few hours to feed it, but I can assure you mine has fared very well being fed only once every 2-3 weeks! If you wait as long as I do between feedings, I recommended feeding at least twice in a 12 hour period prior to using in a soda to ensure it is extremely active. Wait at least 3-4 hours after feeding before use in soda.
Easy Homemade Ginger Beer

This recipe makes approximately four easy-top home brewing bottles worth of ginger beer. Each bottle holds roughly two liquid cups.
Ingredients
- 7 cups of filtered water
- 2-3″ piece of fresh ginger root, minced
- 1 cup plain white sugar
- 1 tablespoon molasses
- 1/4 teaspoon salt
- 2-3 long zested slivers of lemon or lime peel (optional, but boosts citrus flavor without the ned for more sugar)
- 1/2 cup fresh lemon or lime juice or combination of both
- 1/2 cup ginger bug, fed at least 4-6 hours prior to use to ensure an active starter
- Fine mesh strainer
- Pitcher
- 4 home brew easy top beer bottles (as seen in the previous video)
- Funnel
Directions
1. Make a “wort” by boiling one cup of the filtered water along with the ginger, white sugar, molasses, salt, and citrus zest. Cover, bring to boil, and lower heat to a simmer, simmering for about 10 minutes. Stir occasionally.
2. In the meantime, juice your lemon or limes. Pour the remaining six cups of water in a pitcher along with 1/2 cup of lemon/lime juice.
3. Grab a strainer and position it over the pitcher. After the wort has simmered for 10 minutes, pour your wort over the strainer and into the pitcher to catch any large ginger and zest chunks.
4. Empty the strainer into your compost or trash. Grab a measuring cup (I use a glass Pyrex two-cup measuring cup), position the strainer over the measuring cup, and pour out 1/2 cup of the ginger bug. (Don’t forget to add 1/2 cup of water to your ginger bug and feed it). Add the 1/2 cup of ginger bug to your pitcher and stir well. Discard any ginger from the starter.
5. Make sure your home-brewing bottles have been washed well with hot soapy water. I like to rinse mine with a mild bleach water to ensure any bad bacteria is not present. When I am ready to pour, I put mine in the sink to catch any accidental spills. Put your funnel in the opening of your first jar, and start pouring. Fill each bottle until there is roughly 1″ of headspace left. If you happen to come up short a little liquid, don’t worry, it should still carbonate well.
6. Place the bottles in a room temperature space, out of direct sunlight, and let sit for 24-48 hours. A lot of pressure can build up so it is vitally important that you do not forget these bottles, or you could risk the bottles exploding. After 12-24 hours you can gently pop open the lid to check for carbonation by sight and sound. You can always let it sit longer if it’s under-carbonated but there’s not much you can do if it is over-carbonated. I recommend testing this outside because if it is over-carbonated the liquid can bubble out of the bottle much like a volcano.* Finally, the time it takes for carbonation to occur depends on how active your ginger bug was, and the ambient room temperature. The cooler the temperature, the slower the fermentation.
7. If you have bottles with a good quality rubber seal, these should stay well carbonated for 1-2 weeks in the fridge. If the soda goes flat, simply let it set on the counter again for another 24-36 hours. The resulting drink won’t be as sweet, but at least you’re saving all of your hard work.
8. ENJOY!
*Ages ago when I was first getting the hang of carbonating my own drinks, I had tried to make a soda out of strawberry juice. When I popped the top the resulting eruption was so powerful it spewed straight into my ceiling creating the largest kitchen disaster I’ve ever made. There was no strawberry soda left in the bottle, and I’ve never tried to make strawberry soda again!
How to Store Fresh Farm Eggs

I sell the occasional carton of eggs, and a frequent question I receive regarding my eggs is about refrigeration. Should you refrigerate farm eggs? I’m going to address that for you today.
Here’s the Short Answer:
This post will go into some detail, with references included, but for those who want the short answer here it is: clean, fresh farm eggs that have not been washed or previously refrigerated can be stored on the counter safely no more than one to two weeks for maximum freshness and flavor with minimal bacterial contamination. For longer shelf life, store them in the fridge for up to five weeks, and often longer. If you do not have access to a refrigerator, at least one study has proven that eggs can be kept for three to four weeks at room temperature if they have been coated in vegetable oil2.

Here’s the Long Answer:
Right before an egg passes out of a bird’s (any bird’s) body, a protective layer, scientifically known as the cuticle, is deposited on the egg5, 10. Colloquially, most folks refer to this protective layer as the bloom. Eggs are porous to allow oxygen to be received by a developing chick, but these pores also leave the egg vulnerable to bacterial contamination. Bacteria is one of the primary reasons eggs will spoil so to avoid contamination, the bloom fills the pores to prevent bacteria crossover10. This means that while an intact bloom is present, the egg is shelf stable.
In the case of eggs purchased from your average grocery market in the US, the eggs were washed immediately after laying, thereby removing the bloom, and promptly refrigerated1. Any time the bloom is removed the eggs are made vulnerable to bacteria penetration10. Even if the bloom is left intact, once the egg is refrigerated it must remain refrigerated. This is because when an egg is cold and placed in a warmer environment it will sweat, and the resulting moisture disrupts the bloom.
There is nothing wrong with washing and refrigerating eggs. In fact, salmonella is the leading cause of foodborne illnesses world wide, with eggs identified as the source in roughly 53% of cases in the US as reported by the CDC4. That is to say, it is incredibly important to take egg storage seriously.
With farm eggs, a properly maintained coop with clean nesting boxes means that most eggs are laid with a beautiful clean shell and a fully intact bloom. Provided the eggs are collected soon after laying and they didn’t reach cold temperatures (for example, if they were laid on a cold winter day and left in the brood box to cool down), the eggs can be safely kept at room temperature for a short period of time. I’ve been hard pressed to find exactly how long it is safe to keep eggs at room temperature, but one frequently cited article from 1970 states that the bloom starts to break down after four days8. One article from Mother Earth News equates one day on the counter to seven days in the fridge, and other blog posts suggest anywhere from 1 to 4 weeks on the counter is safe for unwashed eggs2, 6, 7. But what is actually safe?
I wanted to dig a little deeper into egg preservation methods, and I did come across a few studies, of which I had free online access. In one study, by Eke, M. O. and colleagues in 2017, researchers wanted to assess egg storage techniques for developing countries, such as Nigeria, in which a refrigerator may not be available. They looked at three methods for storage: unwashed, stored at room temperature; unwashed eggs coated in vegetable oil stored at room temperature; and eggs that have been refrigerated. They assessed several parameters of egg quality, including bacterial, mold, and yeast contamination; loss of weight, change in Ph, and overall yolk and albumin quality. In all parameters measured, by Week 1 the non-refrigerated and non-oiled eggs were already decreased in all measures, while the oiled eggs and refrigerated eggs were still pretty close in quality to each other, and have changed little from the Day 1 measures. By weeks two, three, and four the room temperature and non-oiled eggs were radically decreasing in quality, while the other two groups were still close to each other. In the bigger picture, the refrigerated eggs retained the highest quality, but the oiled eggs were a close second, while the non-refrigerated and non-oiled eggs quickly decrease in quality.
When choosing to store eggs at room temperature, it may be wise to coat your eggs in vegetable oil!
How I Handle My Eggs
Earlier I mentioned clean eggs with a fully intact bloom. Unfortunately chickens are not perfect creatures, and even the cleanest coop cannot stop a chicken who has stepped in poop from stepping on her egg, or on an egg that’s already been laid. Sometimes poop happens! Anytime I have a small amount on my egg, I wipe it off and cook it within 1-2 days. If I don’t plan on cooking with it I put it straight in the fridge. Even an intact bloom is not a perfect barrier against poop sitting directly on an egg. Salmonella is no joke! (See FDA article if you don’t believe me!)
If the egg is heavily coated with poop, I absolutely never give it to a customer. I select only the cleanest eggs for distribution and store them in the refrigerator for maximum shelf life. For myself, I wipe it off and bake it in a baked good to ensure it is well done. I do not fry or those eggs, just in case. Fortunately, it’s rare I have a really dirty egg, and I bake a lot.
If you are really worried about egg safety, the only tried and true method of avoiding foodborne illness from eggs is to use fresh eggs, and cook them well done. But who am I kidding? I’ll take mine sunny side up.

References
1“Cleaning.” Incredible Egg, http://www.incredibleegg.org/eggcyclopedia/c/cleaning/.
2“Day 13 – Must Fresh Eggs Be Refrigerated?” Living Homegrown, 23 Oct. 2014, livinghomegrown.com/day-13-must-fresh-eggs-be-refrigerated/.
3Eke, M.O., et al. “Effect of Storage Conditions on the Quality Attributes of Shell (Table) Eggs.” Nigerian Food Journal, No Longer Published by Elsevier, 10 May 2015, http://www.sciencedirect.com/science/article/pii/S0189724115300722.
4Food and Drug Administration, HHS. “Prevention of Salmonella Enteritidis in Shell Eggs during Production, Storage, and Transportation. Final Rule.” Federal Register, U.S. National Library of Medicine, 9 July 2009, http://www.ncbi.nlm.nih.gov/pubmed/19588581/.
5Gole, Vaibhav C, et al. “Effect of Egg Washing and Correlation between Eggshell Characteristics and Egg Penetration by Various Salmonella Typhimurium Strains.” PloS One, Public Library of Science, 12 Mar. 2014, http://www.ncbi.nlm.nih.gov/pmc/articles/PMC3951326/.
6Happy Chicken Coop. “The Happy Chicken Coop.” The Happy Chicken Coop, 13 Jan. 2020, http://www.thehappychickencoop.com/how-to-store-your-chickens-freshly-laid-eggs/.
7Steele, Lisa. “Should I Refrigerate My Farm-Fresh Eggs?” Mother Earth News, 2016, http://www.motherearthnews.com/real-food/should-i-refigerate-farm-fresh-eggs-zm0z16aszsor.
8Vadehra, D. V., et al. “Role of Cuticle in Spoilage of Chicken Eggs.” Wiley Online Library, Journal of Food Science, Jan. 1970, onlinelibrary.wiley.com/doi/abs/10.1111/j.1365-2621.1970.tb12354.x.. “Role of Cuticle in Spoilage of Chicken Eggs.” Wiley Online Library, Journal of Food Science, Jan. 1970, onlinelibrary.wiley.com/doi/abs/10.1111/j.1365-2621.1970.tb12354.x.
9Whiley, Harriet, and Kirstin Ross. “Salmonella and Eggs: from Production to Plate.” International Journal of Environmental Research and Public Health, MDPI, 26 Feb. 2015, http://www.ncbi.nlm.nih.gov/pmc/articles/PMC4377917/.
10Wilson, Peter W, et al. “Understanding Avian Egg Cuticle Formation in the Oviduct: a Study of Its Origin and Deposition.” Biology of Reproduction, Oxford University Press, 1 July 2017, http://www.ncbi.nlm.nih.gov/pmc/articles/PMC5803769/.
Building a Green House and a Few Homesteading Book Recommendations

In December I finally nagged by boyfriend into helping me build a greenhouse. To start, I used the book Step-by-Step Projects for Self-Sufficiency: Grow Edibles * Raise Animals * Live Off the Grid * DIY. This book is fantastic! It has dozens of projects ranging in scale of difficulty, and many of them are on my to-do list for this coming year. Many of these require at least basic knowledge of tools and building, but trust me, if I can do it you can too!
Okay, full disclosure my boyfriend is 100% the muscle and 98% the brains behind all major building projects. My 2% is just coming up with the idea and then cheering him on. However even with this build, I actually contributed, mostly measuring for boards cut, and then subsequently screwing it all together while he did all of the cutting. I couldn’t be happier with the results! I have included pictures of the build, but the book has more comprehensive pictures as this post is not intended to be an instructional guide. Ultimately we spent about $200 in materials, not including the plastic which we already had, and it took us about 10 hours. Way cheaper than buying a kit and we can make it our own.
I’ll go ahead and wrap up this post by saying building a greenhouse is only the first step. You’ve also got to learn how to use it! I consulted several books and online resources before settling on a favorite choice, The Greenhouse Expert. This book is a little older, but it really takes you from the beginning to the end of greenhouse gardening. It guides you through selecting a style based on your needs and types of plants to be grown, building materials, venting options, maintaining temperature, floor plans, growing tips, and so much more. I feel way more comfortable setting up my little seedlings and you can look forward to future posts on the subject. Check out the project below!
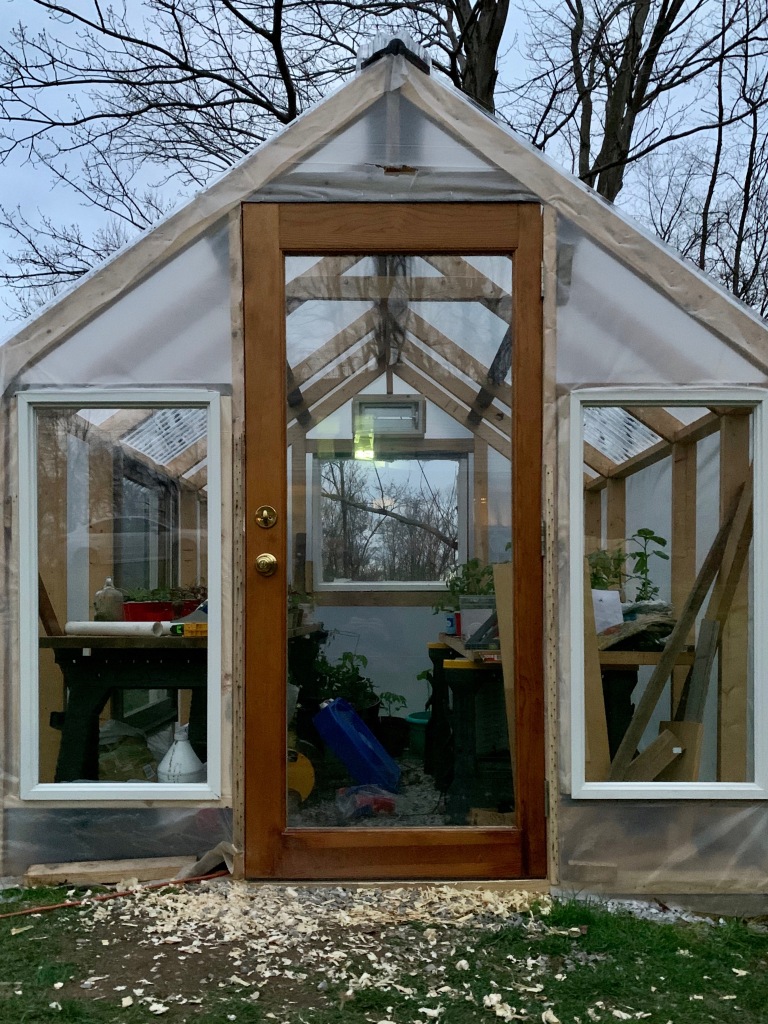


Chickens: Why deep-litter composting doesn’t work (for me) and benefits of using a dropping board
When I first obtained chickens, I had four: three hens and a rooster. I eagerly scoured the internet and library reference books in an effort to learn everything I could about chickens. I want the very best for my birds! In terms of coop litter management I came across one recommendation fairly often: deep litter composting. Of course this was how I decided to manage my litter initially but after a year of trying I called it quits.
Deep litter composting is a method of litter management in which the chicken litter is left inside the coop to compost as the chickens are still using it. This means the litter must be turned regularly, with new bedding added as needed. The litter is supposed to compost and therefore not smell. The idea is you use less litter and as an added bonus in the winter, composting generates heat from the good bacteria breaking everything down which helps keep the coop warm. Spoiler alert: this did not work for me. Additionally, when writing this article I’ve searched Google Scholar for evidence that deep composting is effective and came up with exactly zero articles. It’s all speculation!
There are numerous types of litter and even more opinions regarding each type but here’s the most common types for backyard chicken keepers: straw, untreated pine shavings, or sand. For deep litter composting straw and pine shavings should be used as sand does not compost.
I don’t have a picture of my initial coop set up but I was using straw and at its deepest it was roughly 2′ deep. I stirred the straw regularly with a pitch fork and added new every two week or so and the coop always smelled like an old barn. When summer ramped up it started to smell of ammonia so I did a deep cleaning and put all new straw in. However, within a month of the deep cleaning I added seven new birds to the coop and it only took a couple of months before I threw in the towel. In case you didn’t know: chickens poop a lot!
Every morning there were massive piles of droppings under the roost. I’d turn them under and add new straw, but despite doing this daily the coop was dusty and wreaked of ammonia. I was going through a bag of straw every two weeks! That was NOT cost effective and the litter was straight up nasty. Ammonia also poses a serious health risk for chicken’s delicate respirator systems. And news flash: it wasn’t even warm. There was no composting action happening at all even with the addition of Mana Pro’s Coop N’ Compost.
That’s when I came across a post by popular blogger The Chicken Chick: “Dropping Boards, because Poop Happens“. The idea is you put a board underneath the roost to catch the poop and you scoop it up daily. I was sold.
I consulted with my handy-dandy boyfriend and laid out my idea. I wanted to use scrap plywood and install it using scrap 2x4s as braces against the wall. He thought I had lost my marbles, but he complied with me anyways! This was on Thanksgiving Day 2019. We ended up having the materials on hand, and we added a little trim piece from more scrap wood to help contain everything. As a bonus I also had leftover cabinet paint that I used to paint the whole thing. Cabinet paint is water resistant so the plywood should last for ages. The only tools we used were a circular saw and a drill. It took longer to paint it than it did to build it, and even if you had to buy the materials brand new it should cost less than $20 without paint. This is a trivial amount compared to the cost of all the straw I was buying!
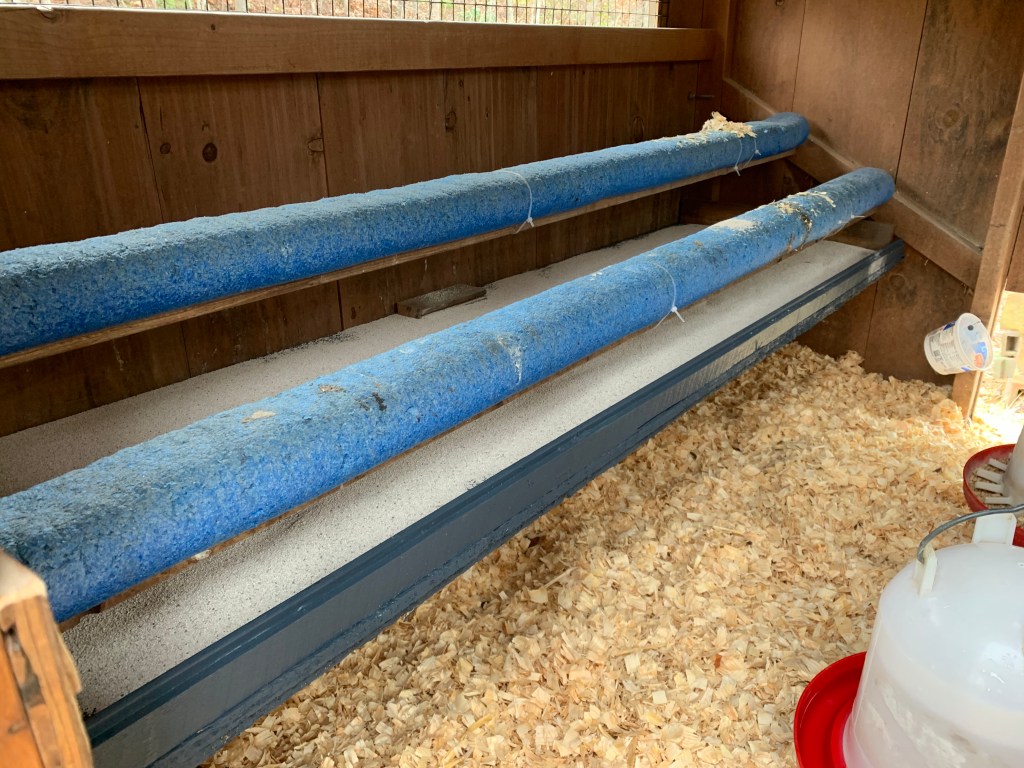
As I’m sure you’ve noticed: that’s not straw I’m using. I decided to switch to pine flake at this point because the straw was just way too dusty. Pine can be dusty too, but so far it’s been much less than the straw. The Chicken Chick swears by sand but I decided not to use sand because one of my ladies has a recurrent case of bumble foot and the vet said jumping onto hard surfaces can cause it or worsen it. Additionally my large roo, Rooster Cogburn, likes to nest with his lady Henrietta on the coop floor. Sand would not be very comfortable for them and with pine shavings (vs straw) I can easily scoop up their larger clumps of poo with a cat litter scoop. Sand doesn’t compost either and depending on where you purchase it, it can also be dusty.
That brings me to my final point, the fine layer of sand material that you see on the dropping board is Sweet PDZ. You know that expensive Coop N’ Compost from Manna Pro that costs $9 for a tiny bottle that is gone in one application? Don’t waste your money on that. I purchased Sweet PDZ, a horse stall refresher in a 25 pound bag for $11 at Tractor Supply and this stuff is the bomb, and it is essentially the same thing as the Coop N’ Compost. Not only is it safe for compost, but it’s safe for ingestion if an animal eats it. I spread some over the litter and a nice layer of it on the dropping board. It’s now February 2020 and I’ve never witnessed my birds try to eat it or get onto the dropping board.

It has been three months since installing the dropping board and I have not had to change my litter once! I’ve added extra as needed which has totaled one bag of pine flake and half of a bag of Sweet PDZ. I do still rotate the litter with a pitch fork every 1-2 weeks do stir in any missed droppings. Thus far the litter has remained dry and not smelly. Only a daily basis I scoop up roughly half a gallon of poop from the litter board and it only takes a couple of minutes! The poop goes straight to the compost pile. This system is dynamite!
My advice is, if you have less than five birds, deep composting may actually work. Any more birds and you should reconsider using deep composting as a safe and effective method of coop management.
Edit (04/10/2020): I made it until the end of March with no need to change the pine shavings since Thanksgiving, but roughly three weeks ago I decided to purchase a new litter type from Tractor Supply, Grounds All Natural Animal Bedding. It is made from recycled, used coffee grounds. I spent $30 and bought three bags which covered my 5′ by 6′ coop with roughly 3-4″ of bedding. I continued to use pine shavings in the brood boxes. Grounds is dust free, recycled, and fully compostable. My thoughts are it is better than sand because it is compostable, and sand can contain dust. As an added bonus, I can now scoop any wayward poops. It’s been three weeks and my coop smells like a fresh cup of joe and is largely poop free. I have also started saving and drying my own coffee grounds to help replenish any that is lost. I hope to make it six months to a year without changing the bedding!
Welcome to Humble Hills Farm

Even in January, the homestead has a big to-do list!
Here we are at the beginning of 2020. I will be honest in saying I have been working on this blog for sometime, and it has been an ongoing learning curve. I think all of my farm hobbies have been easier than getting this blog together! If you want to know more about the farm, please visit the About section of my blog. I’ve finally got myself organized, and so I would like to begin with a summary of what the homestead has going on in January:
- We discovered we lost our beehive over winter (it appears they swarmed) and so we mailed in the check to pick up two new nucs in May.
- I ordered five new chickens to join the flock, including a Blue Copper Maran rooster and a Black Copper Maran hen. I chose a new roo with the idea that maybe I will sell the chicks or hatching eggs from these two.
- We built a greenhouse for which I would like to write a more in-depth post later. Actually, we built that in the last week of December, but who’s counting?
- A friend of mine, and owner of Hands on Wellness, LLC, has reached out to me to build a partnership. We are currently working on a plan to distribute goods produced and/or made at Humble Hills Farms starting with homemade lye soap, which will be another post in the near future.
- I have officially started some of my seeds indoors, namely, onions and a couple early tomatoes and peppers.
The Egg Shortage: How It Affects Homesteaders and What We Can Do About It

The recent egg shortage sweeping across the United States has been making headlines—and for good reason. From skyrocketing prices at the grocery store to empty shelves in some places, many people are feeling the impact of this shortage. For homesteaders like myself, the egg shortage is both a challenge and an opportunity.
As someone who raises chickens, I’ve experienced firsthand the struggles that come with keeping a steady egg supply. But I’ve also seen the ways homesteading can be a solution to food security issues, especially in times like these. If you’re someone who’s feeling the sting of higher egg prices or worrying about the availability of eggs at your local store, it might be time to consider how raising chickens could not only help your household but also help alleviate the pressure on the broader food system.
The Impact of the Egg Shortage on Homesteaders
For many, the egg shortage seems like a distant issue—until you’re standing in front of the egg section at the grocery store, staring at an empty shelf or seeing the inflated prices. For homesteaders, it’s a bit more personal. We know how valuable eggs are not only for sustenance but also for the joy chickens bring to our daily lives. Chickens provide us with fresh eggs every day, and for some of us, this has become a staple in our kitchens.
The shortage has affected us in a few ways:
- Higher Feed Costs: With more people raising their own backyard flocks due to the shortage, demand for chicken feed has risen, making it more expensive for those of us already raising hens.
- Limited Availability of Chicks: Just like eggs, baby chicks are also in short supply. Hatcheries and local farms have seen increased demand, which means that if you’re new to raising chickens, it might be harder to find stock or it could come at a premium price.
- Pressure on Small-Scale Homesteaders: With large-scale commercial operations struggling, even small-scale homesteaders are feeling the impact. Feed and equipment costs rise, and even local egg sales (where allowed) can become more competitive.
Ewith these challenges, homesteading offers unique advantages during tough times like these.
Homesteading Can Be the Solution
The good news is that raising your own chickens for eggs can be an incredibly effective way to bypass the issues brought about by the egg shortage. Here’s why:
- Local, Sustainable Food Source: Raising chickens on your homestead means you don’t have to rely on grocery stores or supply chains that are affected by national or global disruptions. You have a sustainable food source in your own backyard.
- Fresh, Nutritious Eggs: There’s a huge difference in taste and nutritional value between store-bought eggs and the fresh ones from your chickens. Homegrown eggs are packed with nutrients, and the quality of life your chickens lead plays a role in the overall quality of the eggs they produce.
- Empowerment and Self-Sufficiency: Raising your own chickens gives you greater control over your food production and encourages a more resilient and self-sufficient lifestyle. It’s a powerful feeling to know that, no matter what’s happening in the world, you’re still able to provide for yourself and your family.
What We Can Do to Mitigate the Egg Shortage Impact
If you’re feeling the pinch of the egg shortage, here are some steps to help you navigate this time and perhaps even turn it into an opportunity:
- Start Raising Chickens: If you haven’t yet, consider starting your own flock. Chickens are relatively easy to care for, and even a small flock can provide you with enough eggs to meet your needs. If you’re worried about the upfront costs, consider starting with a few hens and adding more gradually.
- Support Local Farms and Homesteaders: In times of crisis, supporting local farmers and homesteaders who are still producing eggs can help ensure that you have access to this vital food source. Check farmer’s markets, local feed stores, and community groups to find nearby homesteaders who may be selling fresh eggs.
- Improve Your Chicken Care: If you already have chickens, now is the time to optimize their living conditions. Ensure they’re receiving a well-balanced diet, ample space to roam, and a safe, clean coop to reduce stress and encourage healthy egg production. You might also want to supplement their diet with scratch grains, mealworms, or other protein sources to boost egg output during colder months or stress periods.
- Preserve Eggs for Later: If your chickens are producing more eggs than you can eat right away, consider preserving them. There are multiple ways to store eggs long-term, such as freezing them, dehydrating them, water-glassing, or pickling them. This will help you stock up and ensure you’re prepared for any future shortages.
- Teach Others to Raise Chickens: The more people who raise their own food, the more resilient our communities become. Consider offering advice, mentorship, or resources for people in your area who are interested in raising chickens. A strong, local food network is crucial during uncertain times.
Conclusion
The egg shortage may be a frustrating challenge, but it’s also an opportunity for those of us who are willing to put in the work to be part of the solution. Homesteading isn’t just about surviving—it’s about thriving, even in difficult times. Raising chickens for eggs not only provides a source of food, but it also helps build resilience within your household and your community.
If you’re already raising chickens, take pride in the eggs you’re producing and the quality of life you’re offering your flock. If you’re thinking about starting a flock of your own, don’t wait—now is the time to take the plunge. The egg shortage won’t last forever, but the benefits of homesteading and raising your own food will.
Farm Fresh Eggs: Are they profitable?

At the start of 2024 I began tracking all poultry-related purchases and egg sales. Since our family homesteads, my intention is to ensure all homestead ventures will benefit the homestead in some way. My backyard flock is one of the most questionable ventures in terms of profit, so I needed a means to measure the outcome. I developed and used this spreadsheet for every purchase and sale for the year 2024.
All poultry expenses including feed, pine shavings, meal worms, medical supplies, etc. were documented. I also tracked every egg sale. My current price is $4, but occasionally I have folks who give a little extra because I do deliver locally at no extra charge. I did not track the amount of eggs that my family consumed, although I estimate we consume one to three dozen eggs a week.
The Results
In the end I spent $1809.39 on feed and supplies, and I sold $1333 worth of eggs, which was around 340 dozen. So I am in the “red” $476.39. If I were buying my own eggs, assuming we ate 2 dozen a week, I “saved” $416 and would have been in the red $60.
So are keeping chickens profitable? No. Is a $60 a year hobby terribly expensive? Also no, but that doesn’t account for the fact that we spent at least $4000-$5000 over the last eight years on coop building, chicks, medical expenses for a certain favorite chicken (I’m looking at you, Burrito), and fencing. Essentially, it seems that these chickens will never pay for themselves.
Final Thoughts
As an aside, in 2022 I raised my prices from $3 a dozen to $4 a dozen. Most of my regular customers took this change graciously. Unfortunately, when using social media to drum up customers, I have occasionally had people comment about price. The thing a person has done was to try to undercut me with their own “cheaper” eggs. In doing so they hurt themselves as well as me, and they dismantle the comradery that should be shared for interests such as this. While these instances have been rare, I feel the need to point it out because of how difficult it is for me to sell eggs in the first place. Daily I collect, clean, package, and then personally market and distribute these eggs. That doesn’t include the time invested in the care of the hens themselves. The value in purchasing local is insanely high. You are helping a neighbor, a dreamer, an animal lover, and the animals themselves when you purchase local. It is so much more than a $4 price tag.
On one final note, I was unfortunately forced to cease free ranging my flock in March 2024. In addition to the expense of using high-quality feed, I now miss out on the supplemental calories gained from free ranging. I have been mercilessly plagued by hawks and foxes. After losing three hens to a fox in one month, one of them being a favorite hen and another was a highly valued broody hen taken right in front of my eyes, the girls were closed up for good. They have around 800 square feet of fully enclosed run space, and a supplemental fenced in space currently of 200 (soon to be 400) additional square feet for supervised ranging. I feed table and garden scraps when they are available. I’m sure free ranging would improve feed expenses were it feasible.
If I could raise my eggs to $5 a dozen I would. Perhaps it is my own fear getting in the way, but I haven’t been able to take the leap.
If you’ve made it this far, I thank you. If you are one of my regular customers, I appreciate you from the bottom of my heart.
